Showing posts with label Streaming. Show all posts

Saturday, 24 December 2016

How to Watch Satellite Subscription Programs Free Of Charge

Entertainment comes with a price. Even the very basic of home entertainment using TV is not free. In my location we pay a license to own one and another subscription to top up the free to view channels to watch decent programs. And depending on the package, it could mean a hefty chunk of the monthly budget.

But with the high speed internet already available, coupled with gadgets and brilliant apps makers, it could mean some savings to your monthly entertainment budget for some popcorn during a marathon movie night.

Here's what you need and how to set-up.

  • An android tablet or mobile phone with at least OS 4.1 (Jellybean) or above. The latest is better. You can check the OS by going to Settings>General>About Device>Android Version


  • Using your android mobile phone, download the application at https://www.mobdro.com/ . Do not stray away from this site as the others will lead you to a never ending link of advertising. See screenshot of the site below and click download the app.


  • Once dowloaded and before hitting install, make sure that your device is authorized to install unknown applications by going to Settings>General>Security>and tick Unknown Sources


  • And also make sure that the minimum requirement Android 4.1 or above is onboard your mobile or tablet.Otherwise a parse error message will display and the installation will not be complete.

  • Successful installation will not ask you for additional setup and will work straight away. Now you can enjoy a wide variety of cable and satellite programs from movies to sports and other international channels for free.

  • Enjoy and merry xmas to all!


Wednesday, 28 January 2015

Two Ways to Watch Movies From Laptop to TV

If you've been successful from downloading movies from sources that do not show the download links( read previous post...../how-to-download-movies-without-download...), you might want to play this in a bigger screen like your television. Here's how you can do it, the equipments you will need and  free softwares to install.

Play your contents to TV.


Wired.


1. The easiest way to do this is with wires. If both your computer (3) and TV(1) has HDMI(1&3) ports then all you need is HDMI connector(5). With this, both video and audio signals are carried by the connector.

If you have an older laptop with VGA(4) connection, make sure your TV has this input(2) port as well and purchase a male make VGA or SVGA(6) connector. And if this is the case, you also need a 3.5mm male male (7)connector for the audio.


Adverts:


Wireless.


2. The easiest may not be the most convenient solution. If your TV has HDMI input, then you can use wireless connection to view your laptop's content,  even if your laptop doesn't have one, as long as it can connect to a router. This is by means of a streaming device, the chromecast. You also need a router, and a video converter, in this case I used Freemake Video Converter. You also need to download and install from your computer chrome browser, and chromecast extension. 

If you do not have chrome browser yet, you need to download and install it first before chromecast.

Steps:

Ready
1. Download and install chrome browser then chromecast application.
Connect
2. Connect your chromecast device to your TV's HDMI port.
3. Power chromecast device by connecting the accompanying USB cable to chromecast device and the other end to the TV's USB port if it has one, or you can just use the supplied power adaptor.
4. Switch the TV's input to the HDMI port where the chromecast is connected.
5. Make sure your router is on.
Set up.
6. from your laptop, open up chromecast application and set up your chromecast by following the onscreen procedure, which is similar to the screenshoots below.


8. Once it is set up, open up chrome browser and you will see the screencast icon (8) at the upper right corner of the browser. Click it and click the name of the chromecast (9) to connect . The icon turns blue(10) when it is connected and the screen casted chrome tab will have the icon(11) at the right most part. The content of that tab will be shown to your TV.


Cast your movies.

9. Whilst at the active tab, press simultaneously ctrl + o(letter) and a navigation window will open. Go to the movies you have downloaded and select the one with mp4 extension.


10. The selected movie will appear at the active tab window(12) and this content will be shown on your TV. You will also notice that the address bar is replaced with the file path(13) of the selected movie.


11. Other file extensions like flv, avi and so on doesn't stream with chromecast. But if you would like to play movies with extensions other than mp4, you need to convert them into mp4 first. Freemake is very good at this. See similar post on how to do the conversion at

http://prakticality.blogspot.co.uk/2014/06/how-can-i-stream-downloaded-movies.html


Last Words.


Either way, you can enjoy your movies on a bigger screen. Although wireless is more complicated, it is more convenient as you do not need to access the back of you tv to connect it. You can also control the movie from where you are seated as the laptop is doubled as the remote as well. In this mode, you can multitask, meaning whilst the movie is streaming on TV, you can work or access the internet using other tab of the chrome. As only the active tab is screen casted at the one time. Although there is a BETA version of full screen casting(mirroring), meaning what you can see in your computer screen is what you see in your TV, I personally prefer one tab casting.

The downside is the wireless traffic, when many devices are connected to the router, which might affect the streaming speed and hence, wired connection is more suitable.  And if you require to output your movies in an instant and do not have the time to convert it to a suitable format(mp4), then wired solution has the advantage.

Monday, 30 June 2014

Improve Browsing Speed Using Hola

There are several ways to speed up browsing experience, like adding more RAM, upgrading to a more powerful machine or trying the latest internet connections like fibre optics and 4G. No doubt these ways can improve the way you access the web but this also means an extra money out from your wallet. Here's a way you can improve your browsing speed without spending anything!

Use Hola


This is a "social caching"site that speeds up browser by saving web contents from it's users in one location. Instead of your computer doing the "caching" of web pages, Hola's servers does this. As it involves all of it's users, this means the web pages "saved" from one particular site is on a massive scale compared to the pages saved by one user on a particular computer. This means loading of pages is faster as well.


Get it!

I use google chrome for this demo.


  • Just go to http://hola.org/    and download(2) the extension.
  • The downloaded file(3) is automatically added to Chrome's browser extension.
  • The Hola icon appears(4) at the top right after successful Chrome integration
  • If the extension is not added for unknown reasons, as long as it is already downloaded(3) click "Start using Hola, it's free" one more time (5). Click Add(6) at the pop up dialogue.


Use It!


  • You have the option of signing up(7) with social network or google account (8), or choose to register with existing email.
  • Move your mouse to the browser picture area and from there an address bar window(10) appears where you can type the website you want to go.
  • You can also change your location (proxy server) by going to the flag's(9) drop down menu.


Enjoy it!


This is an additional feature of the site that can "change" the location of your access so that you can "unblock" (11) restricted contents according to region like the US exclusive(12) Hulu.  To see which region restricted popular sites that can be accessed to your location, go to https://hola.org/access/popular


Note


There are some sites that do not work with proxy servers like gaming sites or even website hosts. So if you are having a problem doing financial transactions or editing a website or a blog, click the power button(13) to  shutdown Hola.


Tuesday, 17 June 2014

How To Convert Downloaded Movies To Stream Using Apple TV?

Apple TV is very good in streaming movies from apple's iTunes library. In fact any movie that you can  play with iTunes even without adding it in the library can be streamed from any computer that runs iTunes, windows PC's included. However, not every video format is compatible with it. Downloaded videos in FLV, MKV and even AVI formats will not play in iTunes. This means they are just ignored when you want to play them with iTunes. They need to be converted to MP4 first.

I use a free application to convert almost any movie format into MP4. This can be downloaded from


Aside from being free, Freemake Video Converter is very easy to use and fast too. It can convert a video into many popular formats like apple, android, avi, flv, mp4 and many more. See picture below.

How to convert videos compatible to apple TV using FreeMake Converter.

1. Open the application and click video(1)
2. This will open an explorer window and go to where you kept the video you want to convert, in this case, it is under Movies(2). 
3. Choose the one you want to convert(3).
4. Click OK(4).


5. Choose which format you want to convert it. MP4(5) is usually compatible to most media players, iTunes included. This is more flexible than any of the formats available.

6. Next step is to choose the quality(6) of the video. The quality affects the file size, so if you want to transfer your video into a mobile phone, there is a selection for mobile quality. The only downside is, it will not look good when played in a big screen.

7. Choose where(7) you want to save the converted video.

8. Click convert(8)

9. The elapse time during conversion is shown at the popup window. At this point, you can cancel or pause the conversion anytime by pressing the correct button.


How to stream converted video to Apple TV

10. The video is now ready for apple TV streaming. Assuming your apple TV is already connected to the same network as your laptop, right click the converted file(10).

11. Click "open with" and select iTunes(11)


12. Click the airplay button(12) 

13. Then choose appleTV(13).Now you can enjoy the converted movie on a bigger monitor using apple TV!


Saturday, 24 May 2014

How To Stream Multimedia From a Windows Laptop To an Apple TV

Apple TV is great with apple devices. It can output anything you can see on the screen of an iPhone, iPad or iMac in a single tap to a bigger screen. You can see web pages, photos and movies or play games in full view depending on the size of the TV that it is connected to. And it does this wirelessly. Another talent of this little device is not only limited to apple products. It can also stream movies and music from a windows laptop or PC.

Here are the simple steps to do this. Just make sure both the apple TV and windows laptop are connected to the same wifi network.

1. Download iTunes and if you have it already, make sure you have the latest version.

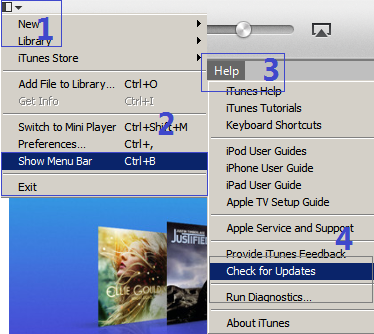
Click the drop down menu(1)>Show Menu Bar(2) to show Help(3)>Check for Updates(4). It will let you know if you have the latest version or needs updating.

2. Add files to iTunes library. You can add a file that you have purchased through iTunes or acquired somewhere else. You can add any multimedia as long as it is inside your computer.

Click the drop down menu(1)>add file to library(5)>locate where you kept your files>choose the file you want to add(6).

3. You can check the files that you have just added by clicking the file category menu(7). Like in the example, the movie file is kept at films category(8). It shows you the number of files and you can distinguish the newly added one by the label added to the thumbnail. Clicking the monitor icon(10) lets you choose if you want to output the movie with the laptop or apple TV(11).


4. To stream the playback to the apple tv, double click the file and the movie will start playing at the TV monitor. Your laptop will show you the progress and the apple tv's connected status(13).


Saturday, 8 February 2014

Apple TV's Problems and Solutions

Buy it 10% off !


It's more than two years since we have the apple TV. This was bought mainly for the mirroring of the iPAD and the iPhone. It was just secondarily meant for Netflix movies. As I am not really a diehard fan of apple, it's the missus and the kids who use it primarily. And they encountered problems which the trouble shooter in the house needs to solve. And here they are.

Apple devices can not sustain mirroring.

This problem arises from watching mirrored movies from any online websites. Symptom for this is, any device can connect and OK for the first minute then the connection drops. As the connection is by wi-fi, I thought restarting the router by turning on and off (plugging and unplugging it's adaptor) will be the solution.  I was also thinking of interference of other wi-fi devices but the problem still persisted after switching their  wi-fi buttons off. I found out clearing the cache of Safari from the mirrored device  is the best solution. If you are using other browsers, you need to clear them out as well.

Mirrored images have different color from the source.

I have experienced this "ghosting of images" before from SVGA connected devices, the images displayed at the playback screen have different color from the source. Sometimes the screen is flickering. This is no difference with the HDMI connection, which loosen from time to time caused by physically moving the apple tv or loosen connection from the HDMI port of the playback TV itself. Re tightening it up will immediately fix this. If it doesn't try other HDMI port from the TV. If the problem persists, then try another HDMI cable.

ADVERT
Buy Apple TV's HDMI cable


No image!

This is a classic tale of my wife when the kids are finished with their games. Sometimes they mess up the HDMI ports on the telly or the HDMI cables on the devices when they bring in the living room their gaming console from the conservatory specially when it is too cold in the winter or too hot in the summer. A simple solution to this is to write a label on the TV's HDMI port to distinguish which one is which. Or you can just scroll down with the telly's menu to the list of the input source and try each one out.

No sound!

This actually made me panicked. One day there was no sound coming from a video using the built in Netflix application although the apple TV's system sound(the click sound it makes when you push a button on the apple's remote) is OK. I tried to play the same Netflix movie on the iPAD and the sound is alright. I ruled out Netflix is not the problem, or  my cables and my internet connection. It is the apple TV itself. My suspect on the apple TV became more obvious when I tried all the built in streaming sites within. They do not output a sound! 

The obvious and quickest solution for me at this point is to reset the unit into it's factory settings. But the thought of filling out the query box and long network key without a keyboard made me decide to investigate further.

Checking on the settings, I noticed that the time zone is set to Cuppertino and not London, and the regional setting is set to USA and not UK! After putting the correct information, the sound came back!

Sunday, 4 August 2013

How to Use Apple TV to Stream Multimedia From Android Devices

If you have an appleTV, and want to stream photos and other multi-media files from an android device then you are at luck that it is now possible with paid application. But if you are not keen of coughing up more money for apps and do not want other physical contraptions then there are free apps than  can do this. Though it may not be a solution for those who want to stream HD contents specially videos because of bugs and limited functions.

I use Samsung S3 for this tutorial and a free AppleTV Airplay Media Player (Zappo TV). Here's how to do it.

The AppleTV Airplay Media Player (Zappo TV)


Installation

1. From your mobile, download the application from apple store. Search Airplay Media Player (Zappo TV)

2. Open the app and tap the upper right button(1) to create an account. You have an option to receive news letter from the developer when you click(2) yes, or just finish off with tapping done(3) at the top right hand corner.


3. You do not need to authenticate your registration, you can log in straight away with your credentials.  At the "Browse" page you can see the services  like "Video Podcasts", "YouTube" and etc. And at the bottom, you can see other pages like "Now Playing", "MyZappoTV" , "Devices" and "Help".


Pairing

Make sure the AppleTV and your android phone are connected to the same Wi-Fi access.

4. There is no complicated set up that is needed at the receiving end, just turn on appleTV and the telly.

5. On your android device with the application running, tap "Devices" (4) and under "Your Home Network", see if Apple TV  is detected. If not, check the connection of the AppleTV on your router.

6.Tap Apple TV(5) to select it. Once selected, it should appear at the "Currently Selected Apple TV Player"(6).


Your telly will output the logo of the application at it's screen.


Playing Media

7. Go back to "Browse" (7)and select the media you want to stream, at this point there is a video service for youtube and  others. To stream a file from the android device, go to "Android Gallery"(8) and from there, you can select your photo, music or video files.

8. Once selected an item (example here is a photo file), an icon saying "TV off " is shown, Tap(9) it to turn it on.


The android device will then be beaming the selected file onto your telly.


My thoughts

This app is good in streaming photos from an android device but after sometime it stops working. Streaming videos is also good, but struggles to output large files.  I am thinking of a bug that might need fixing in the future. Because it is free and if you are just looking for something to use your appleTV to stream photos, then this application is worth a try. 

Tip

Whilst waiting for an update to fix bugs(when it stops working), the temporary fix that I usually do(to android apps that stops working) is to clear it's data and cache. You can do this by going to the Android's Settings, Applications Manager, select AppleMediaTV, clear data, clear cache, then restart your apps.


Thursday, 3 January 2013

Why Get an Apple TV


My wife is an apple fan. She expects things to work straight away out from the box without complicated settings. Reliably simple that works every time, that's how she find apple products.

Now that she can view her favourite pinoy tele-dramas on her ipad and iphone, thanks to the site's new interface, I decided to get her something that can mirror these on a big telly. This means being able to use her ipad or iphone to output what's on the screen to a bigger monitor wirelessly. You might be thinking of streaming, but streaming can only output something that is already inside the device, like the itunes contents, and not from an outside source like the internet. To me, mirroring is rather more advanced as it outputs the things you do with the device like surfing internet sites, playing games and using VOIP communications. I also think that it is useful when you are doing a presentation and would like to use your ipad or iphone as a source for files and as a remote control without complicated settings.


What's inside an apple TV box

Like any of the apple product range, the packaging is simple and minimal. Inside the box is the apple TV receiver, the remote control, the mains plug extension and some paper works. It is just a shame the product does not include HDMI connection which is needed to make it work with any TV with HDMI input. You need to purchase one if you do not already have one of this.


Setting up

To set up the apple TV, you need a telly with HDMI input, HDMI cable, wi-fi router, iPAD or iPhone. Connect the other end of HDMI cable to the apple TV and the other end to the telly's HDMI input.Turn on your TV and select the HDMI channel input for the apple device. Then plug the mains socket into the apple TV, and with the remote of the apple TV, press the play button. The device will guide you through to the set up menus. Remember to set up both the apple TV and your apple products ( iphone, ipad, ipod, imac etc.) you intend to output the contents into the same Wi-Fi network as the apple TV.

If you want to use a wired connection to connect the apple TV and wi-fi router, you can use an ethernet connector, RJ45, to do this. I prefer this kind of connection specially that we use the built in internet video provider, Netflix, to watch movies. This kind of connection depends on the proximity of the router, TV and apple TV.


Use Apple TV to mirror internet content

This is the function that I intended for my wife to use, so that she can view her favourite internet programs on her iPad onto a bigger monitor. All she needs to do is to double click the home button and scroll through the apps going to the right and find the airplay button. Tap the airplay button and choose apple TV then turn on mirroring. Follow the same procedure if you want to use iPhone, and if you use iMac or other Mac computers, go to systems preference and under display menu, choose apple TV and turn on mirroring. Now you can output anything you do from your device.


Tips

Before setting up the unit, it is best to download the remote application for the apple TV. This will let you type in your details and settings easier. Direct link of the application is below.


If you have the first generation ipad, you can still stream internet contents and your itunes contents using the device. What it doesn't do is to mirror your activities. There are also built in applications for videos and movies like netflix, vimeo, itunes movies and you tube that you can access without the use of another internet device. 

Which generation of apple device is compatible? As long as you see the airplay button when you double click the home button of your iphone, ipad or ipad, you can play the content on your apple TV.For notebooks and iMacs, if you can see the airplay button at the top of you can detect the apple TV at the display settings, then your device is compatible.


google.com, pub-9356159227116695, DIRECT, f08c47fec0942fa0

ShareThis

Popular Posts