Monday 24 August 2015

How to Zoom-in Online Photo's Without Downloading

The mobile phone has been the  device of choice in going online, specially when visiting social networks and viewing photos. It's portability, availability and connectability has made it surpass other means of accessing online contents. But there is a little problem, it's size, specially when viewing photos.

Photos from social media can be a little inconvenient to view because of the way it is processed when uploaded. Social medias reduce the photo size before they go live. In effect, the picture file has a standard low resolution when viewed on the site compared to when it is downloaded. That's the reason why FB photos can only be zoomed in on a certain extend. And most of the time I find it not enough to see more detail on a photo. 

The usual solution to this is to download the photo before you can really zoom in to a better magnification. There is also a way to get round this without downloading,  by doing a screen capture. Once captured, the photo viewer application of your phone takes over. The zoom in power of the app exceeds that of the web page and gives you a more blown up rendition of any photo.

a. original picture as rendered by webpage
b. original maximum zoom-in by webpage
c. screenshot photo pinched to zoom-in
To do a screen shot on an iphone, press and hold the power on button( button on top) and the home button simultaneously until the screen flashes. You can also hear a camera shutter sound with it. You can access the screen shots at the camera roll.

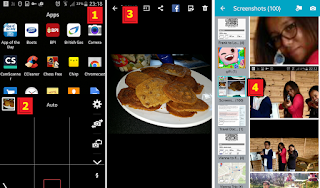
To do a screenshot on an android, like the iphone just press both the power and home button until a camera shutter sound and the camera screen flashes briefly. You can access the screenshot straight away from the notification area or by using the camera icon with the following touches: camera(1)>touch the photo that appears at the top left(2)>tap the back arrow at the top left(3)>scroll down and touch the screenshot folder(4).


Wednesday 12 August 2015

Reveal Wi-Fi Key Using Command Line

Can you memorize your wifi passkey or have you written it down and save for future use?. The fact that once a device connects to the wi-fi gateway and  memorizes it's SSID and passkey, we tend to forget to do this. as we do not realise when we need it again, like when a house guest asks for an internet access or set up a new device.  Here's a quick way of revealing this bypassing the need to log in   using the router's ip address  by using direct command lines.

Reveal Wi-Fi Key With Command Line


Command lines are powerful "magical" words and terms that can make changes in your computer. They are straight to the point commands that can fix, reveal, execute a function or even destroy a computer. And they are useful as long as you know the command line, you do not need to click through the visual keys of windows functions or path to go to a particular function.  Here's the few steps.

  • Activate command line.


For windows 7 and earlier versions, click start, and at the search window type cmd. (1) At this point, do not be tempted to press the enter button yet. Wait until the search result comes up with cmd.exe. Right click cmd.exe and click run as administrator(2).


For windows 8 and above users, click the windows button + s to reveal the search window, type cmd, then click cmd run as administrator.


  • Type this at the command prompt.


The console would pop up and at the prompt, type in the following:

netsh wlan show profile name=type the name of your wifi SSID here key=clear

For example, I have SKY4434E as my wi-fi SSID, I would then type(4)

netsh wlan show profile name=SKY4464E key=clear   

Remember that the SSID name is case sensitive.

The wifi key is revealed as key content(5)..

Click photo to enlarge.


Saturday 8 August 2015

Upload Photos in a Flash

Holidays means photos, and there's nothing that can stop you in recording memories specially now that they can be stored digitally on a stick without worrying about the cost. But the temptation to share it to the world  through social media or emails can be hindered by sluggish upload, specially when your photos are taken with a high resolution camera. Not to mention the bandwidth your ISP provides, as they usually deliver lower digits for uploads compared that for the download. This  means the speed when you are uploading is just a quarter or less  than when you are downloading..

To compensate on this situation, one of the solution is to reduce the file size of the load. You might already be thinking of photoshop or other premium paid for application, but believe it or not, you do not need one to do this. It is already built in to every windows computer, an under rated application that in fact the most common tool that I use when I open up my laptop.

The Paint Program


This is under the accessories (1)on earlier versions of windows up to windows 7 and can be accessed using the search function(2) on  windows 8 and newer versions by typing paint or mspaint.


The Paint application is a "basic" photo editing program built in to every windows operating system. Though it can't do extensive editing task that other premium apps can, reducing file size of a picture with it is very easy. Here's are the steps.

  • Load photo to paint.
There are many ways to do this, one is going directly to the picture  folder where you keep the photos you are planning to upload . As you will be using the paint to edit the photos from this folder, it is more practical to set them all to open with paint. To do this, right click one of the pictures, and if you see that paint is not selected as default (4), click change, select pait(5), OK(6), then apply(7). Now, all files with the same extension as the recently changed default program will open with paint(8).


Another way is whilst paint is active, you can load the photos by using it's built in browser, click the dropdown  menu at the top left corner(9), open, choose the correct folder(10) and the correct photo file(11), then open.


  • Paint compared to other photo editors.


The good thing about using paint when reducing file size is, it renders the original size of the picture. Not like other applications that pictures are automatically rendered to fit the screen, no matter how large the file size is.

Below is an original  picture size using Irfanview. I can also use this program to reduce it's size but because it is rendered full blown, it will be hard to know how many pixels or percentage I am going to reduce it to.

Rendered by IrfanView
The paint version might not be attractive at first as it shows the raw size of the image. This rendering is very useful and the the information  below, size of the file(A) and the picture view percentage(B) are important in determining how far would you go to resize it without compromising the the picture's rendition..


  • Find Suitable Resize Value


Resizing is not just cropping though you can do this first to eliminate unwanted features. This also reduces the amount of pixels from the chopped portion. To find the suitable resize value, drag the slider(B) towards negative until the whole picture is fit to the viewer window. The resulting figure gives me 25%(D) of the original size. This means I can resize the photo down to 25 % (1/4)of the original 2.6MB(C) size and still gives me a viewable picture. Note that at this stage the photo is not yet resized.


  • Resize.


Click the resize button(12) and tick percentage(13), type the value(25) then click OK.


The photo seemed too small(14) for the time because the viewer is still set to 25%(F). The size has been reduce to 187.KB from the original 2.6MB.


To see the correct rendition, slide the percentage to 100%(G),  the whole picture at 187 KB(G)! As this file is way lighter than its original size, this will upload faster, uses less bandwidth, but the rendition will still be the same.


  • Last Words


The only downside for this is when you are planning to further manipulate or enhance the image, smaller file is limited to what you can do so before you resize your photo's,  it is recommended to make a backup of each picture you will be editing. I found out that creating another folder side by side to the original is easier, Just rename it any name you like, then from the original folder,  copy the pictures you will be manipulating and paste on to the new folder.


Sunday 2 August 2015

The Android Lollipop Experience

I was in holiday vacation when the OTA Lollipop update for the Note 3 was pushed to my device. Lollipop is already around for a while and has been adopted by newly built android devices but in my case I have not experienced it first hand. I was still with the KitKat operating system which I consider it as better than it's predecessor. And knowing that  the Lollipop is the latest version, I have high expectation on the latest android offering and excited to try it out.

Installation


The Lollipop update arrived as a reminder. Clicking the reminder made the device download the necessary files followed by installation. There was no problem during the installation, the device restarts after the installation is finished. Then the optimisation of the downloaded applications followed. Unfortunately, not all applications I downloaded are optimised or compatible with Lollipop. This make them crash randomly. So I did uninstall them for a while.


First impression.


Honestly, I do not like the looks of it. The native icons look bland and even the colours a little unpalatable. Though there are colourful native wallpaper to compensate. The notification interface is paper flat style stack(A) on each other like a 3D(B) rendition. Though I do not like it visually, functionally I find it very good.


Application icons are in their proper places and inherits their default looks except for the native samsung and google applications. All apps do not need restarting except the kaspersky internet security that needs you to allow it's access to the phone's resources.

Widgets that are active before the update stays the same except the S planner that needs to add to the screen again.

Problems after installation.


The first problem I noticed is the battery life. It seems like it lost half of it's holding capacity. Before the update, the battery lasts twice as much. The active applications button also show many apps being active from time to time. Although I do not remember starting them on.  I also noticed that the wi-fi service does not wake up as quick as before. I need to turn it off then on again to connect to the home wi-fi. There is also a noticeable lag when I use mobile internet. But this could be a network issue that sometimes it goes terribly bad.

Some applications can be problematic. The chess game I usually play to kill time gave me two queens in the middle of a game and then randomly crashes. A ringtone maker does not recognise the mp3 file that it usually does!


Lollipop after a week.


The battery problem seems cured after a week, and the applications showing from the active applications button became lesser. Although I still need to terminate some of them from time to time. This could be due to an update to the applications themselves making them more adaptable to the new operating system. Though the wi-fi and internet data are still problematic. If this is a network issue or a bug in the operating system, then at the moment there's nothing I can do but to wait for the update that can resolve this.

On the bright side.

Like other new operating systems, they get better through time. There might be bugs that affect the way the device works, and some incompatibility of programs that are downloaded, updates are soon available to address these issues.

Lollipop like other android operating system, hides an easter egg within. But this time, it is not only graphic animation but a game. You can access this by going to the settings>general>about device>then tap "android version"(1) repeatedly until the lollipop icon appears> tap and hold the lollipop icon(2) until the game starts(3)! Enjoy!


google.com, pub-9356159227116695, DIRECT, f08c47fec0942fa0

ShareThis

Popular Posts