Showing posts with label Facebook Tips. Show all posts

Monday, 24 August 2015

How to Zoom-in Online Photo's Without Downloading

The mobile phone has been the  device of choice in going online, specially when visiting social networks and viewing photos. It's portability, availability and connectability has made it surpass other means of accessing online contents. But there is a little problem, it's size, specially when viewing photos.

Photos from social media can be a little inconvenient to view because of the way it is processed when uploaded. Social medias reduce the photo size before they go live. In effect, the picture file has a standard low resolution when viewed on the site compared to when it is downloaded. That's the reason why FB photos can only be zoomed in on a certain extend. And most of the time I find it not enough to see more detail on a photo. 

The usual solution to this is to download the photo before you can really zoom in to a better magnification. There is also a way to get round this without downloading,  by doing a screen capture. Once captured, the photo viewer application of your phone takes over. The zoom in power of the app exceeds that of the web page and gives you a more blown up rendition of any photo.

a. original picture as rendered by webpage
b. original maximum zoom-in by webpage
c. screenshot photo pinched to zoom-in
To do a screen shot on an iphone, press and hold the power on button( button on top) and the home button simultaneously until the screen flashes. You can also hear a camera shutter sound with it. You can access the screen shots at the camera roll.

To do a screenshot on an android, like the iphone just press both the power and home button until a camera shutter sound and the camera screen flashes briefly. You can access the screenshot straight away from the notification area or by using the camera icon with the following touches: camera(1)>touch the photo that appears at the top left(2)>tap the back arrow at the top left(3)>scroll down and touch the screenshot folder(4).


Saturday, 21 March 2015

How To Back Up Facebook Account

Most of us use social media for fun, others use it for more serious reasons like storing photos and videos. And why should not be? It is easy to set up and can be managed from anywhere, not to mention that it is free compared to limited free cloud storage. It's easy interface is also suitable for everybody.

But FB is also a breeding ground for hacking attacks, and we've heard of many that has moaned about losing photos and even important files as their accounts has been compromised or can no longer be opened. So before that happens  to your account and loss important files, back this up!

The benefits on making a backup is not only to preserve the uploaded files. The backup also contains ads that you've clicked, your friends and removed friends, invited events, all messages, photos, notes, videos and many more FB activities you've engaged.

The requirements.


  1. You need to have an access to the email address you have set up your FB account.
  2. Zip archiever. The data is compressed into a zip file so you need to download and install one first. I use Winrar in this tutorial and you can download it here.
Here's how to backup.

Preparation to download.


  • Log in to your FB account and click at the arrow down link(1)>settings(2)>download copy(3)of your facebook data.


  • The next window will confirm your request(4) and at this point will let you enter again your FB password before FB starts the archieve(5). A confirmation (6) will tell you to wait for the download link.

  • It took me at least 6 minutes(7) to wait until the download link(8) is available. The download time depends on the overall amount of data you have uploaded and how much activities you've engaged into. Internet connection speed is also another factor. For myself that have started FB 2009, my account has accumulated 158MB of data and took at least 10 minutes of my time.

Archieving.


  • Once downloaded, go to the location of the file and create a new folder(9). Rename the new folder to any of your liking, in my case, I named it Facebookdata(10).Click Drag and drop the downloaded zip(11) file to the newly created folder. 


  • Once inside the new folder, right click on the zip archieve(12) and click extract here(13). The zip archiever window will show the pathfile(14), you do not need to do anything just click ok(15) to begin file decompression or extraction.


  • The archiever will automatically create another folder(16) for the extracted file.


Accessing data archieves.


Inside the new folder contains all FB archieves. There is a dedicated folder for photos and videos but can also be accessed using the HTML folder. Clicking on the links will open up the files using the default browser, in my case chrome. Example path of the events file below.


Thursday, 2 January 2014

Practical Photo Sharing Tips

Have you shared your photos yet taken during christmas and new year? Gone are the days when you usually share them using the post. This time it is easy using digital snaps and the internet. In just a few clicks, your family and friends can already see whom you were with and what was in the menu.

Sometimes it is not really straight forward to upload photos, especially when you are using large photo files from an SLR or from any high megapixel camera. As they are so big, it takes time for you to upload them. And when it is uploaded, depending on what device they use to access them, your friends may have a problem in downloading them.

Here's a practical explanation on how you can upload faster and how to get a copy of a photo that can not be downloaded.

Upload Photos Faster


You can upload an image faster by reducing it's size. But before that, you might like to trim or crop the photo to remove unwanted elements. If you are using a windows computer, you do not need to additional software as the paint program can do this.  After cropping, next is to resize it. 

Paint is my favourite program to do resizing because it shows me the correct dimension as you resize it, and I find it very easy to use. Other programs automatically fill in the whole photo in the screen as a default view.

An 8.3MB photo. Using paint, you can preview the size of the image whilst using the adjustment at the right.


Here's the photo at 25% of the original size. This means it can shrink the 8.3MB at 25%  and still get a reasonably good photo size.


At this stage, I tried to resize it by 25% of the original 100%. 


If you think the size is still high, you can still resize it. I did resize it a bit more until I come up to a 679KB  from an 8.3MB photo file! This means this can be uploaded, theoretically, 12 times faster!


It will also benefit those who will be viewing your photo as they will have 12 times faster loading and use 12 times lesser bandwidth, especially those using mobiles and dongles on a low data tariff. 

Resized or not, when a photo is uploaded into a site's server, it will still be resized, especially on social networking sites like facebook. So it is better to resize whilst the photo is still at your hands to benefit from faster uploading.

Photo's Can't Be Downloaded


There are sites that the web masters disable the right click menu. This means you can not bring out the save as menu to save an image. If this is this case, a straight forward solution to copy a photo is to do a screen shot. To do this, go to a page or a photo you want to copy, press Prt Scr button, open up paint, then press paste then save. 

If you have a problem downloading emailed photos on your facebook email account using a FB application on your smartphone, do not worry, there is nothing wrong. This is just how FB designed their apps, it doesn't have the necessary button to download. The soft keys menu are not helpful as well.


Good news is, you can download this using the smartphone's built in browser. Go to http://m.facebook.com, navigate to the emailed photo attachment and a download button is just below the image. You can also use the left soft key to bring out the download menu.


Friday, 10 August 2012

Top 3 Facebook Security Features


-->

Hacked account is one the most annoying experiences of having a social networking account, particularly facebook. Once hacked, the hacker takes control of your account profile and the annoyance starts there. He can post anything on your behalf and can send spam messages to anyone in your contact lists. He can send anything he wants with your name taking all the discredit. And he doesn't stop there as he can go a lot further. He can change your password, personal details and other details like email verification for account reactivation, until you can no longer log in to your own account.

Did you know that there are security features included within facebook that can detect if your account is compromised? These features can be a source of information whether it's time to change passwords or if your account has been taken over by a hacker. It can also protect you from accidental exposures when you forgot to log out using a public computer or somebody else's. All you have to do is to enable these built in security features. You can explore and try these features by clicking at < home drop down menu, account settings, security> so that you won't fall into the same fate of a hacked account like the one below.


1. Secure browsing

When enabled, facebook will use https in logging in. This will add a layer of protection on what you send like user name and password online. Using https instead of the plain http will make your online activity encrypted. This makes it difficult for hackers to see what you are doing or what's you're typing in. Just in case he see's your screen remotely, or intercepts the packets of information you are sending. The hackers could not hack what they "could not" see.


2. Log in notifications and log in approvals.

After enabling this feature, the next time you log in, a check point (pic 1) will let you enable the device you are logging  into by naming it and saving it into your list of machines to access your account. In the future, when you or somebody tries or have already logged in into your account from any other devices, a notification (pic 2) will be emailed into your log in email telling you about this. If you did not logged in to this device then you could easily secure your account by clicking the link secure your account on the email.


If you prefer to be notified by a text message instead of emails,  log in approvals will send you a code to the mobile you set up with this security feature when you use an unrecognised device. I am not just sure if you will be charged whilst receiving a notification.


All of the recognised devices will be listed and you could just unauthorise  any device by clicking remove opposite the device's name.


3.Active sessions

Wherever your Facebook account is accessed by you or by somebody, the activity is logged with the time of access, the approximate location, the device name (the name you've given to the device when you enabled log in approval), and the application you used. The approximate location is guided by the ip address being used. You can see the ip address by hovering your mouse over the address detected. In case you do not recognise the location or ip address and any of the logged data, you can just click end the activity to log out your account. This security feature is also useful when you forgot to log out when using a public internet cafe or when you used your friend’s device.

The data below says that my FB account is active in six different devices and have not logged out properly.


My Thoughts

These built in security features are useful in tracking the activities of your account online. Just in case somebody got their eyes on your account and start logging in as you. You can track and stop the device they log in from and and stop the device from accessing your account just incase you've used other devices to log in but forgot to log out and the device remembered your credentials. Built in features may not at all times protect your account from all threats, but it is better to turn those on than to stay unprotected at all.

Wednesday, 4 July 2012

Facebook Scams


There are a lot of scams circulating within facebook. And users are falling for them. Why?


1. The freebie promise. Free galaxy s3's, iphone's, ipad's, or money.


One example is the $100 gift card starbucks promise. To good to be true. If you inspect the FB page links, none of these point to starbucks official website, but to a blogspot, www.sbcasdasd.blogspot.com. Starbucks is a big company that can afford to pay for a domain name, and will not necessarily need a free blogspot.


The blog is only a decoy site redirected to a different url at www.starbucksvoucher.org where you will be lured to sign in other fake offers.


What the fakebookers want from you?

This is a classic way of making data base of emails, your friend contacts and other personal informations. The information they can gain depends on your engagement of the bait they put in. From there they can sell your details to  legitimate or illegitimate marketing companies. And anytime soon expect your email, telephone, cellfone,or facebook page  flooded with adverts or messages from companies you've never heard of or contacted before.

Who are they?

Using whois, the owner of the site starbucksvoucher.org is from Albania. See the details at http://www.whois.net/whois/starbucksvoucher.org


Similar scams.


2. Fake fund raising with liking pictures of injured or sick people.

So what's wrong with liking these photo whilst you have all the good intention to help with your like clicks? There is nothing wrong to feel and show you want to help by clicking like, but this is not what the advertisers is in their minds in the first place. This is just to lure your good intentions for their data gathering plus your personal and social information.

3. Prominent people dead, had accident or involved in a scandal. Scammer's really dig everyone's curiosity when they posted the following.


4. Rogue applications. This includes apps and browser extensions that promise users to remove timeline, enable dislike buttons, see who is viewing your profile, facebook  "verification", celebrity lookalike and others.


Installing these apps and other browser extensions will only make your browser vulnerable to browser hijackers. They can change your browser's default settings like your home page or default search engine without you knowing. In other cases, the apps will create "backdoor" passages for other malwares to pass through.

5. "Do you remember this photo" message. This will lead you to a site that can infect your computer with a virus, trojan, or worm. If your antivirus program's definition is updated, it could detect that the url is a threat. They call the file name img, jpg, png, bmp or anything that make surfers think as an image file type to lure them to click. Remember that file name is different from a file type.


There will always be a new threat in social networks and scammers are getting clever and become more innovative and will do anything to make you click a link or the like button. Be sure to update any internet security you have everyday. But remember that all of us has the best protection against this threat, our sensibility. If you see these or other similar posts, ignore it and alert facebook. Never share it.

Monday, 4 June 2012

FB Timeline Tip


FB Timeline Removal

Not everyone is a fan with the timeline FB interface. In fact I do not like it myself. A lot of times, there are applications out there that claim they can remove and revert back to the old interface. Can these apps really do this? The answer is no.

What they REALLY do is they tweak the way you view FB page! In fact most browsers has available extensions and they work by instructing your browser to act like an old and outdated browser such as Internet Explorer 7 that Facebook timeline does not  support.  One such application that can do this accross browsers is FB purity, you can download and install it from

http://www.fbpurity.com/install.htm

Another one is an extension for chrome, timeline remove. See further down.

FIREFOX

Once you've installed FB purity and If you are using firefox, click tools, user agent switcher, internet explorer, internet explorer 7


SAFARI

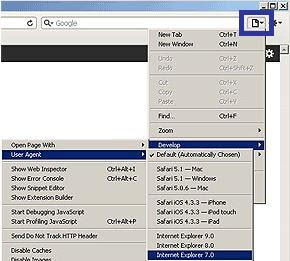
If you are using Safari,  you need to first go into the Preferences menu, click Advanced, then tick the "Show Develop menu in menu bar" option, then exit the preferences menu.

Then click the page icon menu  then select the "Develop/User agent" menu, there you can choose the useragent you wish to use for the current website you are viewing. Then choose Internet Explorer 7.


CHROME

If you are using Chrome, click the wrench icon, tools,  extensions, then get more extensions(at the bottom).


At the search box, type timeline remove or fb timeline remover etc., and a list of extensions will appear. I have choosen the first on the search result.


Just a reminder that the extension did not changed the FB timeline codes. The timeline FB interface is the permanent interface at the moment and other computers or browsers that do not have the extensions intalled will still show the timeline.

My FB page without the extension and with extension (FB timeline remover???)

Without Extension/Timeline Interface
With Extension/Old Interface

Higher than internet explorer 7 users have no choice but to get alternative browsers like the ones above to view the old FB interface at the time of this post but I am sure there will be anytime soon.

Monday, 14 May 2012

How to perfect timeline Facebook profile cover

After the timeline in Facebook is activated there's no going back. Although a lot of people like it, there are still many, including myself that like the old interface better. Why? It is simplier and easier to follow. It is also easier to see and search for what you're looking for. But timeline is here to stay, so we just need to live with it.

The profile cover is something new. Seems like so easy to set up but is not really easy to perfect. Sometimes the part you want others to see in the picture is not the one shown. Specially when you use the photos in your FB album without editing first.


Like the one above, I am sure the owner wants to show something else. Or maybe she really loves the trees, or nature! But looking at the original photo gives the clue, that she might have wanted to show their pretty smiles rather that the tree tops.


Although we can drag the photo when setting the profile cover, sometimes we just can't. Like the one profile cover below. Only a part of the face is showing, like peeking through a window. I am certain the owner wants to move the photo a bit higher but can not! 


The solution is to customize the photo you want to use into a banner format. You can crop a part of your photo using any built in photo editing software, a rectangular shape of 1:3 or 4 ratio. I use paint  (click Start, All Programs, Accessories, Paint)  usually to crop things. Then resample or resize it into a specific dimension. Then edit it or upload it straight away.

Below are the simple steps that can guide you into making your  perfect FB cover.


Choose a photo

You can choose any photo you want and crop it into a rectangular dimension using  paint program or irfanview  (click for free download) or any photo editing program that is available on your computer. If you want a photo in your FB profile, you can screen capture it or download it into your computer then do the editing. In this example I used a screen capture of my site.


Resample/resize

Then open up the cropped image using  irfanview or any other photo editing software that can resample or resize a photo. To resize using irfanview, click Image, Resize/Resample, tick Set New Size, choose Pixels as Units, then type the dimensions width = 850, height = 320


Upload

The image at this point can now be uploaded to your profile cover with almost accurate dimension. You can edit it into your liking and upload it later. Just make sure you have the dimensions 850 X 320 pixels at the end.

The resulting edited profile cover is below, with all the captions and elements I wanted to show.


Sunday, 23 October 2011

Facebook chat for iPAD Update 2

I haven't been using the iPad for a while to access FB, neither by using the default application or either by the customised aps to access FB contents, specially the chat function. Just recently I've found out that the FB's native application for iPAD already has a chat function on it.

 The updated native iPAD FB  app is neater , the interface is easier to follow and navigate. It's chat function is somewhat hidden, and  only is available on the landscape mode. If an iPAD user rarely use the device in the landscape mode, he surely will not know FB chat in official application.

Screen shots below.

At portrait mode, tapping the the menu button, squared with green box, will only show the sub menus at the left. and will not allow you to scroll left.


From the portrait mode, rotate your device into the  landscape mode and scroll the page to the left and the chat button will be shown on the left.


Pressing the box with the arrow will get you online.


And your online friends will be shown ready to chat!


 Buy IPAD now and pay in 2012 at 
PC World from £399.00

Buy IPAD accessories at 
Carphone Warehouse

Did you think you can not get an IPAD 2 as a free gift with a mobile contract? Yes you can, use the gift search from this blog and click high llighted bottom text to see all free gifts offered.


http://prakticality.blogspot.com/p/mobiles.html


Previous related posts

http://prakticality.blogspot.com/2011/05/facebook-chat-at-ipad.html
http://prakticality.blogspot.com/2011/10/facebook-chat-for-ipad-update.html
http://prakticality.blogspot.com/2011/07/how-to-facebook-video-chat.html


google.com, pub-9356159227116695, DIRECT, f08c47fec0942fa0

ShareThis

Popular Posts