Saturday, 30 June 2012

Make Any Photo Into 3D


3D is taking over the entertainment world. There are 3d versions of past movies that were shown long time ago, but because of this "new 3D" versions, people still want to see, even they know already what's happening in every scene. How did they do that? Re shoot the scenes? That would be costly. I guess the film makers are just using softwares to do that, and charge the viewers more to see the movie they've seen before because it is in 3D. Viewers like you and me, would go and wear that 3D glasses, because of the different viewing experience.

Even the way we take photos, cameras become sophisticated and manufacturers lure us to double camera lenses that can view stereographic images and store them into 3D's. But this type of camera comes with a price, higher than the normal 2D versions. Do we really need 3D images anyway? Speaking for myself, at some point, I really want to see a 3D version of an image, but I do not want to spend extra just to do that! And the good news is, you can make a 3D version of any image taken from any camera. 

What do you need?

1. A computer
2. Chrome browser
3. Chrome add on.
4. Online account for photo storage(facebook, flicr, etc)
4. 3D glasses (red/cyan type)

Red/Cyan 3DGlasses
£0.99 only
  More Details!


  • If you do not have Chrome browser in your computer, download it now at


 http://google-chrome.todownload.com/


  • After installing, use Chrome browser to add an extension called 3Dnator. Go to google market 


https://chrome.google.com/webstore/category/home


  • Type and  search keyword for 3dnator. download and install it from there.


The icon for 3Dnator is shown at the top right of the browser. You will notice 2D when not activated and just click it to activate 3D. 


Begin making  a 3D  version of any picture image,  by just uploading the photo you want to any social networking site like Facebook, Beboo, Flickr etc. If the photo you want is already uploaded, all you have to do is to use Chrome to get there with the 3Dnator enabled. Go to your photo and right click on it. Choose 3Dnator and a new window with the 3D version will open. Take your 3Dglasses and enjoy the view! 

2DVersion


3DVersion 


You can see the difference more when you compare it side by side. You need a 3D Cyan/Red glasses(like the one above) to enjoy 3d pics. Click on the photos to enlarge.   

  2D Version                                                                               3DVersion


Saturday, 23 June 2012

How to Print From Anywhere Wirelessly

Wi-fi technology makes life easy and simple. Easy in the sense that connected gadgets with the same wi-fi station can communicate and function as much as like the wired counterparts. Simple in the sense that the use or wires is eliminated, so no more spaghetti type connections which is annoying sometimes. Wireless connection adds more space usage flexibility and can be so much useful in situations that space is an issue. Ease of use specially in the area of outputting your work into a hard copy, like printing your documents or photos from a wi-fi enabled device. This you can do anywhere, within the range of your wi-fi devices. You do not need to go and sit down by side of the printer to do that. You do not need to open up your computer or laptop as long as you have a copy on your device. You can print anywhere wirelessly!

What do you need?

1. A router
2. Wi-fi enabled devices (laptop, PC's) or wi-fi enabled mobile devices (smart phones)
3. Wi-fi enabled printer

The wi-fi enabled printer I have for this is the KODAK Hero 3.1 which has ports for memory cards (Memory Stick, SD card, MultiMediaCard), and can support Cloud Printing for those who has a cloud account.

Kodak Hero 3.1   £66.62 delivered

Buy it now!Use these  voucher codes for more savings below
301657        Staples UK - £5 off a £30 Spend or More - Online Only using voucher code
FAI-74861  Free Picnic Basket with £39 Spend Ex VAT using voucher code @ Staples UK
W5-75092   Free knife block set with orders over £39 (ex VAT)using voucher code @ Staples


Setting up the printer.

1. If you've just bought your printer, remove all the self stick protection film and the cardboards protecting the paper feeder slots. The print head and the print ink are still in their packaging and they are located inside the printer. You need to lift the main cover to access this.

2. Connect the printer into the mains and select your language and location. Then you'll be prompted to install the print head and the print ink.

3. You will then asked to calibrate the printer and print a test page. 

4. Setting up the printer into wi-fi 

Once you have successfully set up your printer, a menu will ask you to choose wi-fi  or usb printing.Obviously wi-fi should be selected. You need to select your wi-fi access from the list and key in your network key.

If you do not know your network key go to http://192.168.0.1  and enter admin as user name and password as the password. This is with the presumption that the default username and password are  not yet changed. Then go to the wireless section and see your wireless access key. Then  key in to your printer's wifi setting.

5. Setting up your wi-fi enabled laptop

Insert the installtion cd and once installed you will be asked to choose between USB or  wifi as a printer mode. Click wifi and the driver for wifi will be installed. The computer will also ask you to check if there is an update for the software and it is recommended to search for updates. Once installed,your computer will look for the printer and it should detect your printer. From that point you are ready to print any where.

6. Setting up your smartphone 

Whatever brand you have, go to it's market place, (iPhone at apps store, Android at Play Store) and search for Pic Flick. Install it and you are ready to print wirelessly. 


How to print from your smart phone?

Open up Pic Flick and choose your picture or document then send it to your printer! That's it!


Friday, 22 June 2012

Making Control Panel More Understandable

Whenever you want to do anything on your computer, to add peripherals or personify it, to add programs or delete some, personify it or make it prettier, everything you want to do, control panel is the best bet you need to be in. The problem with control panel is it is a collection of icons. To a technically savy person, these icons mean something like restoring your computer into earlier time or turning the screen display upside down. To a technically challenge person it doesn't mean anything until he tries everything and  gets to the function he wants to have. How we wish every icons in the control panel has a detailed explanation of what it does!


This is the beauty of God Mode in Windows 7. It is a collection of control panel functions in a way that is it is clearly understood. If you want to restore your computer into earlier time, then go to restore computer into earlier time in God Mode. If you want to add gadget into your desktop then go to the add gadget into desktop! Simple and easier to understand!

How to get GodMode (god mode is the official name but of course you can change it according to your will, just type in the name you want.)

Before making a folder, it is recommended to highlight and copy the code first

1. Right click  an empty space in your desktop then click new, then folder. 
2. Right click the new folder and  rename the new folder into (if you have copied the code before the start, you can just paste it)

Prakticality.{ED7BA470-8E54-465E-825C-99712043E01C}


The icon will change and when you click the shortcut, instead of the usual icons of what we usually do with the computer using the control panel, are phrases written in something  easier to understand. This definitely will speed up everything and eliminate hit and miss!


Why Do We Need to Update or Upgrade Computer Programs

Work smoothly

Softwares, applications, drivers and programs are synonym in the sense that they are made up of codes to do things and to work together with other programs and hardwares. This means that when a new hardware or program comes up, an update to the code is needed for a particular program to be able to work harmoniously with the new ones. It's like a shopping list that is being updated according to the menu of the day and the number of guests. Therefore an update is needed to make things run properly and smoothly.

Added functions

An operating system upgrade can make a device do more with added functionality without the need of additional hardware.  If you did remember the earlier generation of iPhone that does not support highlight, copy and paste function, an upgrade fixed that shortcoming. But sometimes  upgrade is not possible because of the limitation of the hardware! Like the old PC's or laptops running XP operating system. It is more sensible to buy a new one if you want to have Windows 7 as old laptops components won't be able to work with the newer ones.

Security

Softwares should be updated to their latest versions. Not only to get more functionality but to be more secure. Virus or malware coders out there are always on the look out for exploits or holes in the software's codes. That's the reason why software companies like windows and others send us "patches" to these security holes to prevent the virures or malwares from infiltrating and creating havoc inside our computers. Not only operating systems but browsers as well. As new threats can be immune to outdated browsers and programs. Even office suites like the microsoft office needs patches for these threats. And most importantly, your virus protection should have the latest threat definition to effectively protect your computer from the latest threats.

How to update?

To make sure you have the latest update on your windows operating system every time, it is recommended to set your computer to check the latest update by clicking start, control panel, (if all items are not shown, click small icons)


All control panel items will be shown, then click windows update, then you can choose to check for update or change the setting to set the computer to update itself automatically which is recommended.


The good thing about updating windows is all of  the new updates of  it's native components like the windows media player, internet explorer, microsoft office and etc., will be downloaded and will be a part of the update! Third party programs like anti viruses and any other programs that doesn't come from microsoft should be scheduled to update automatically or manually separately.


Thursday, 21 June 2012

How to Automatically Play .asx Content on Chrome

Chrome is my favourite browser and  made  it as my default browser  to open web  contents. It's speed has made me decide to choose it over others. However, I encountered a problem in playing  video streaming contents that use the built it Windows Media Player program in my new laptop. As chrome has just been downloaded, the user account control notifications keeps on popping up. UAC makes the laptop safer but in this case, it is annoying. As I need to click twice before windows media player is activated, not to mention the waiting period between clicks.


 I searched on forums on how to automatically play a content on chrome that uses windows media player. One forum's suggestion is to disable the UAC notification, which is sensible but will compromise the machine's safety against's other dodgy websites and threats. As this will mean the playback of a video once you click it without asking you the second time.

Other suggestions are telling to do something about the registry, which I do not have the courage to do. Then something in my mind popped out. Way back when I was using AOL browser, the program does not open up windows media player to play the content but plays it within the AOL browser, with it's own plug in media player. Then I thought that there might also be a media player plug in somewhere within chrome. But on a second thought, it should automatically detect and install it if it is missing! Now the question is, is there a media player plug in or there is not?

How to check plug ins in chrome

Click the wrench icon, then settings, advanced settings, click content settings ( under privacy ), disable individual plugins (under plug ins) and the available plug ins will be listed. In this case, windows media player plugin is NOT in the list.


Download the windows media player plug in


I googled windows media player plug in for chrome and from the resulting search I found a link to download the needed plug in at

http://www.interoperabilitybridges.com/ChromeWMP/wmpChrome.crx


Test video playback

Close your chrome browser and reopen again then go the content that won't automatically play. Initially, UAC will again let you confirm to let the content and the website run with the newly installed plug in. I recommend to choose always run on this site so the site will be excluded from being checked by the UAC and to run automatically everytime.


You can now enjoy your video on your browser without bringing about the full windows media player. You can also choose full screen playback by right clicking the screen window.


Tuesday, 12 June 2012

Is Your Browser Fast and Future Proof?

HTML5 is the internet language for browsers in the future. In fact, browsers are already preparing their brand to be HTML5 compliant as soon as possible. One of the advantages of this code is the handling of multimedia contents. Instead of using plugins or other applications to play videos online, browsers with HTML5 capability will just play the content. This might be the reason why apple did not include  flash for videos, which is a resource hungry plug in, in their products because they know that HTML5 is coming.

So which browser is HTML5 compliant? How can you determine that the existing browser in your computer is HTML5 future proof? This simple online test do not only determine HTML5 compliant but can also tell how  fast your browser is. The speed of browsers are not just limited to your internet connection, but computer hardwares like the CPU, RAM, and graphics play a vital role as well. 

Testing Your Browser

On your laptop, computer, tablet or mobile device, open http://www.peacekeeper.futuremark.com on your browser . Allow the page to load until the test button appears. Click the test button and it could take up to 5 minutes to complete the task. 


The time at the top right shows how much time is remaining and the text at the bottom shows what it is currently testing. There are tests that might be skipped because your browser or device hardware does not support it.


The higher the score, the faster your browser is, and the number below the score determines how HTML5 compliant your browser is. In this result, the browser is 0 out of 7 HTML5 compliant!


To test another browser, navigate to the bottom of the results page and click test another browser. A link will be highlighted. Copy it and open another browser to test, then paste the link and begin testing again.


Results by browsers on Windows Vista Laptop!

AOL (see the score above)

Chrome

Internet Explorer


Opera


Safari


Test your browsers now to know which one is to keep!

Friday, 8 June 2012

Samsung S2 and S3 Cool Tricks 1


This post is a part of mobilers mission.
Fast Wireless File Transfer

Using one of the many connectivity, peer-to-peer type, samsung smartphone range has, activating the wi-fi direct  connection uses  wi-fi functionality between wi-fi enabled devices to transfer files between them, or to print to a nearby wi-fi printer. The device and the target device can connect wirelessly using wi-fi interface and they do not need a bridge to establish a connection. Both can be a server and both can be a target. This function not only see what devices are nearby but can also identify hardware that can do the job you are going to share, like when you want to print something, only the wi-fi direct enabled printer can be seen.

Why do you need it? Yes you have already bluetooth to transfer files between devices but bluetooth is limited by distance, and the file size. If you are planning to transfer a large file, say a whole movie into your devices, you will be better off with wifi direct, it is easier and faster. In my test, it took at least 8 to 9 minutes to transfer the whole 633.3MB of movie from the S2 to the S3 at a greater distance between the two devices, the S2 downstairs and the S3 upstairs, whilst being charged. As mentioned above, you can also use the connection to a wi-fi direct enabled printer.

To enable wifi direct, click settings, more  (under wireless and networks), tap on/off  button of the Wi-Fi Direct. Then tap Wi-Fi Direct to set up and choose which enabled device to connect to. Both of the devices should be Wi-Fi Direct setting enabled! Whilst  wi-fi direct is enabled, the internet connection is disabled as the two functions share the same wi-fi radio device.

On the source device, go to the folder where the file you want to transfer is, tap the  illuminated button at the left of the home button , tap share, then tick the file you want to share, select the way you want to share it, then select the device you want to share with.


As you can see below, the file has been tranferred within at least 8 to 9 minutes (see the time of sending and the completion of transfer) with a large file of 633MB.


On the target device, Wi Fi direct was turned on before the transfer and it has been connected to the device source or server.


The shared file will be at myfiles/sdcard/ShareViaWiFi. You can move the file to any directory or folder afterwards.

Speed up phone function


Swipe to call and swipe to send message

You can call a contact fast without pressing the call button by swiping your fingers going to the right whilst you're in a contact phone number details, swiping in the different direction will let you send message.


Dial Direct

The home screen can be customised in different ways. One of which is the ability of the phone to create a direct shortcut for a contact to be called or sent a message. S2 has this and at S3, I can't see the command. To activate this function, go to the home screen you want to put your shortcuts and tap the screen until a menu Add to Home opens. Choose shortcuts, Direct dial (to make a direct dial button) or Direct message ( to send a text message), then choose which contact to have a shortcut. Now if you want to dial your contact, just go to that home screen and press the shortcut botton for call to place a call or the message shortcut to send a message.


Scientific Calculator

To access this function, make sure your phone's screen rotation is not locked. Tap calculator and then rotate the screen for the scientific calculator to be activated.


Adjust Screen Brightness 

It's annoying when you can't read what's on your screen, because the environment you're in is well lit or there's a presence of a strong glare from the sun or whatever. In this situation you need to get into the screen brightness settings which is at least 3 taps away if you get it first time. But the faint screen tends to delay things up as you struggle to find the correct icon to tap.

You can do this in a single swipe after you unlock the screen by swiping your your finger at the top where the signal icons are from left to right. To activate this functionality, your phone's screen display brightness  should NOT be set into automatic.


Wednesday, 6 June 2012

Internet Not Working After ICS update

A day after ICS update, my Samsung S2's native internet browser does not launch up. After pressing the internet button, the phone's screen splashes blank white screen, then followed by blank black screen. The left and right buttons do not do anything either. This means I won't be able to go to the native internet settings to clear the cache. Afterwards, it flashes a quick message I could not catch up, too quick to make a screen shot!

Alternative Browser

Luckily, everything that connects and uses the internet still worked, it was just the native internet browser that had a problem loading. I downloaded opera browser from the play market and the new browser works. I am convinced that something happened with the native application. At that point, with the alternative browser working, I was tempted to stop, but I need to get a solution for the native internet not working.

TWLauncher

I did the following one at a time, restarted the phone, soft reset it (press volume up and power button for at least 5 seconds until it restarts), took off the battery and started the device, nothing happened. The native internet still gives a blank black screen, and an additional error message saying "twlauncher not responding".


I closed it and went to twlauncher by pressing settings, applications, all, and scrolled down to twlauncher. Pressed force stop and clear data, then restarted the device.


Tried to launch the native internet again but still not working. The good news is the error message on twlauncher did not showed up. The bad news is, all of the personalised screen I did on the home screen were gone. They were replaced by the factory home screen settings. No worries as it's easy to personalise!

Clear Internet Data Through Applications

This has given me an idea to find the internet application and do the same, clear and delete all of it's data, hoping to revert it back to working condition.  Once I found it, I forced quit, cleared data and cache.


Restarted the device and the native internet worked like nothing happened!

I really do not know why this happened after an update. It might be because some files has been erased or overwritten or misplaced to different locations that programs using these files become clueless  where these files are and that's causing the confusion and coming up to an error message!


Monday, 4 June 2012

Samsung S2 Update to ICS


The best online priceso far
Buy now for £18.81/month 
Does your Samsung S2 has the latest Adroid OS yet? You might have it if you've purchased it recently, or at least after Ice Cream Sandwich Operating System is introduced. What's so special about the ICS is it makes functions easier to accomplish like  multitasking,  notifications, customizable home screens, resizable widgets,  interactivity and adds powerful new ways of communicating and sharing. One particular feature is the face unlock, where in the device uses it's camera for facial recognition to unlock the screen!  Clever.

Upgrading is easy and simple and it won't take much time. My upgrade to ICS is just within an hour or less, with O2 pay monthly network. Here's how.

I would recommend a wi-fi connection for this and the phone plugged into the mains socket. Why? Using your home wi-fi is faster rather than using data connection, and I did not know how long the procedure will be initially so plugging into the mains will guarantee full power no matter how long will it takes. 

Go to settings, tap about phone, software update then  update. The availability of the update depends on your network. If the phone does not recognise a new hardware and in is not yet an android 4.0 then contact your network on how you can get the new OS. If it does, just simply download the 223MB package for the ICS.


After download, you will be prompted to install the firmware upgrade. Your phone will close and upon restart, the installation begins. 


To reaffirm you have the latest Android 4 Operating System, go to settings and click about phone.


The unlock screen is different than the old OS, now it is represented by animation of a key being unlocked. I also noticed that the screenshot you take with the new OS goes to the photo folder which has a new subfolder for screen shots, rather than the direct screenshot directory.

The old path for screen capture was /sdcard/ScreenCapture, the new one is /sdcard/Pictures/Screenshots

The bluetooth and wifi interfaces are also different. Once  bluetooth  or wifi function is enabled, rather than an immediate submenu for the searching of bluetooth or wifi devices nearby, you need to tap the bluetooth or wifi icon or text to begin scanning or broadcasting the phone's bluetooth or wifi signal. These are just minor confusing changes but what I really liked is that I also noticed that the battery life becomes longer and the applications and the phone itself became more responsive after the upgrade. 

This is the best time to get the Samsung S2 at a price that is lowest at 18.81 a month. Click here to get it now.

FB Timeline Tip


FB Timeline Removal

Not everyone is a fan with the timeline FB interface. In fact I do not like it myself. A lot of times, there are applications out there that claim they can remove and revert back to the old interface. Can these apps really do this? The answer is no.

What they REALLY do is they tweak the way you view FB page! In fact most browsers has available extensions and they work by instructing your browser to act like an old and outdated browser such as Internet Explorer 7 that Facebook timeline does not  support.  One such application that can do this accross browsers is FB purity, you can download and install it from

http://www.fbpurity.com/install.htm

Another one is an extension for chrome, timeline remove. See further down.

FIREFOX

Once you've installed FB purity and If you are using firefox, click tools, user agent switcher, internet explorer, internet explorer 7


SAFARI

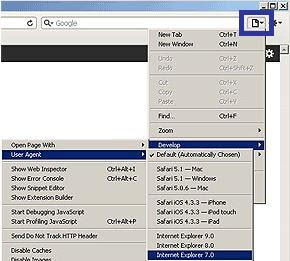
If you are using Safari,  you need to first go into the Preferences menu, click Advanced, then tick the "Show Develop menu in menu bar" option, then exit the preferences menu.

Then click the page icon menu  then select the "Develop/User agent" menu, there you can choose the useragent you wish to use for the current website you are viewing. Then choose Internet Explorer 7.


CHROME

If you are using Chrome, click the wrench icon, tools,  extensions, then get more extensions(at the bottom).


At the search box, type timeline remove or fb timeline remover etc., and a list of extensions will appear. I have choosen the first on the search result.


Just a reminder that the extension did not changed the FB timeline codes. The timeline FB interface is the permanent interface at the moment and other computers or browsers that do not have the extensions intalled will still show the timeline.

My FB page without the extension and with extension (FB timeline remover???)

Without Extension/Timeline Interface
With Extension/Old Interface

Higher than internet explorer 7 users have no choice but to get alternative browsers like the ones above to view the old FB interface at the time of this post but I am sure there will be anytime soon.
google.com, pub-9356159227116695, DIRECT, f08c47fec0942fa0

ShareThis

Popular Posts