Showing posts with label Windows. Show all posts

Wednesday, 12 August 2015

Reveal Wi-Fi Key Using Command Line

Can you memorize your wifi passkey or have you written it down and save for future use?. The fact that once a device connects to the wi-fi gateway and  memorizes it's SSID and passkey, we tend to forget to do this. as we do not realise when we need it again, like when a house guest asks for an internet access or set up a new device.  Here's a quick way of revealing this bypassing the need to log in   using the router's ip address  by using direct command lines.

Reveal Wi-Fi Key With Command Line


Command lines are powerful "magical" words and terms that can make changes in your computer. They are straight to the point commands that can fix, reveal, execute a function or even destroy a computer. And they are useful as long as you know the command line, you do not need to click through the visual keys of windows functions or path to go to a particular function.  Here's the few steps.

  • Activate command line.


For windows 7 and earlier versions, click start, and at the search window type cmd. (1) At this point, do not be tempted to press the enter button yet. Wait until the search result comes up with cmd.exe. Right click cmd.exe and click run as administrator(2).


For windows 8 and above users, click the windows button + s to reveal the search window, type cmd, then click cmd run as administrator.


  • Type this at the command prompt.


The console would pop up and at the prompt, type in the following:

netsh wlan show profile name=type the name of your wifi SSID here key=clear

For example, I have SKY4434E as my wi-fi SSID, I would then type(4)

netsh wlan show profile name=SKY4464E key=clear   

Remember that the SSID name is case sensitive.

The wifi key is revealed as key content(5)..

Click photo to enlarge.


Thursday, 16 April 2015

Hacking Windows Function: The SendTo Button

There are many windows functions that are hidden under the hood. I just do not understand why the ones that are enabled are just the basic functions(1). It is tedious sometimes to keep repeating every task that you do when working with documents or photos.


Like the 'send to' function, it can be configured to send your files to a location of your choice or to a bluetooth recipient as long your laptop has the hardware for it. This saves you time in copying files to a certain location without navigating to it. The same with a bluetooth recipient, you can do this without going  to the bluetooth connectivity first.

How to do it?


I thought making a change like this involves playing with the registry, but I was wrong. It just involves a basic operation of going to the correct file path, you just need the correct incantation. 

1. Open up windows explorer. 


2. Highlight the path(2) and delete the entry, then type 'shell:sendto'(3). 'Sendto' should be spelt as one word without space in between. Do not forget the colon between shell and sendto.


3. Then press enter. The following window will reveal the path and the destinations(4) that are included when you right click a file and click send to.


4. Now you can specify a directory or a file to include in the send to shortcut button. If you can see the directory or folder you want to send your work to just right click it(5)  from the left window pane, select copy(6)then paste(7) it at the 'sendto' window. If not, you can navigate to the folder first and select copy before you do step 2.


5. The additional destinations added to the 'sendto' window (8) will become available when you right click (9) a file.


Now you can easily transfer any file or even a folder easier and with fewer clicks.

Thursday, 8 January 2015

Backdoor Windows Access

I was testing the elementaryOS the other day and I was impressed by it's performance. Aside from the fact that I have found an excellent 'replacement' for windows, just in case I lose all my patience in 'waiting' for a program to run or disappointed by random software crash, it also solved one of the most dreaded potential problem of forgetting a profile's password, when you can not access any of your files because you can not log on to it.

Although it has not happened to me yet, one of my friends 'managed' to forget his. This has made him run into lots of trouble and inconveniences as he could not access the files on his computer, as his profile is the main administrator and did not set up his files to share with any of the secondary users. At that time, I could not help him as I have not known elementaryOS, or have not tried a second operating system to run into a windows computer yet.

The elementaryOS could have helped him as it can access the files from windows on any account, with password  or without, using EOS as backdoor access. Here's how.

What you will need.


1. The elementaryOS loaded into a USB device. (steps to load EOS to USB here)
2. Another USB or any memory card for saving retrieved files

Steps.


1. Boot into elementaryOS(EOS)

With USB loaded with EOS and any second memory card plugged into the laptop, shutdown windows. Turn on again and start pressing F12 to change the boot sequence.  Select the USB with the EOS loaded then choose 'try without installing'.

2. Go to Windows files using EOS as backdoor.

Click the 'applications'(1) menu at the  left upper corner of the screen and click 'files'(2).


At the connected devices, open 'system'(3) where the windows files are located, then go to 'users'(4).


Under users, you will find all the profiles created within the windows environment. You can open any profile(5) even with passwords set up and can access any folders and files. Full access is also rendered meaning, there is no restriction on copying of any file. This is useful when you just want to retrieve files and transfer it to a removable drive.


3. Save retrieved files to the second memory stick or card.

Open the folder and choose the file you want to retrieve then  right click and copy. Under devices, choose the other memory stick(6) and paste in there.


The copied windows file(7) pasted without logging into Windows.


Last words.


Although this software is full of potentials and a relief to those who forgot their windows log in passwords, it could form a threat to those running Windows OS in the wrong hands as this software can access any profile without using a password. In fact it did bypass the 'front' door of windows and goes directly to any profile and files like accessing a backdoor. This has changed  my view that profile passwords are not enough to secure computer files.


Saturday, 20 September 2014

Printer Can't Locate the Opened File

My colleague has problem printing a document yesterday. He said he has not encountered this message on his computer before. It was a fax document that is located over the network.  Hitting print could only produce an error saying "cannot access the file". We even tried saving it to his desktop. The file can be opened, but printing it produced the same problem.

I am not really into IT and my colleague started to dial the technical department for help. It was a long qeue and the automated voice was saying he is third in the line. And we were running out of idea.

I remembered a quick fix with websites that do not allow right clicks for copywrite protection. And the rule that anything you see in the computer screen can be copied in some way or the other. There's no need for a special software, but a built in one. In fact it is just sitting there in your keyboard waiting for the user to unleash it's hidden talent. And most user is not aware of it's existence. Paired with a native image program, they can be a powerful tool.

How Print Screen and Paint Program saved the day.


The Prt Scr (1) button is located at the right top upper keys on the keyboard. The location depends on the computer make. The paint menu(2) can be accessed by pressing start>all programs>accessories>paint.


With the necessary button and program, we can now proceed to print the "can't be located " file.

Open the file and hit Prt Scr button.
Open paint and press paste(3).
To trim the image, press select(4)>rectangular selection(5) then adjust the image using the guide lines(4a).
Hit crop(6) save it to an acessible location like the desktop and the printer did not have any problem accessing the file.


Saturday, 24 May 2014

How To Stream Multimedia From a Windows Laptop To an Apple TV

Apple TV is great with apple devices. It can output anything you can see on the screen of an iPhone, iPad or iMac in a single tap to a bigger screen. You can see web pages, photos and movies or play games in full view depending on the size of the TV that it is connected to. And it does this wirelessly. Another talent of this little device is not only limited to apple products. It can also stream movies and music from a windows laptop or PC.

Here are the simple steps to do this. Just make sure both the apple TV and windows laptop are connected to the same wifi network.

1. Download iTunes and if you have it already, make sure you have the latest version.

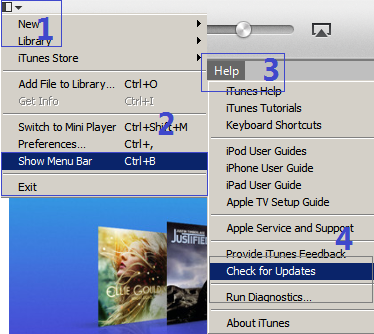
Click the drop down menu(1)>Show Menu Bar(2) to show Help(3)>Check for Updates(4). It will let you know if you have the latest version or needs updating.

2. Add files to iTunes library. You can add a file that you have purchased through iTunes or acquired somewhere else. You can add any multimedia as long as it is inside your computer.

Click the drop down menu(1)>add file to library(5)>locate where you kept your files>choose the file you want to add(6).

3. You can check the files that you have just added by clicking the file category menu(7). Like in the example, the movie file is kept at films category(8). It shows you the number of files and you can distinguish the newly added one by the label added to the thumbnail. Clicking the monitor icon(10) lets you choose if you want to output the movie with the laptop or apple TV(11).


4. To stream the playback to the apple tv, double click the file and the movie will start playing at the TV monitor. Your laptop will show you the progress and the apple tv's connected status(13).


Thursday, 1 May 2014

Speed Up Windows Boot Time: Delete The Registry's Unnecessary Files

Wise Registry Cleaner
Clutter in Windows registry slows down the PC's performance and it's start up speed. But cleaning  these unwanted pieces of files manually can be a complicated task. For the regular user like me, I would not know which one is a clutter and which one is not. These items in the registry are so sensitive that modifying them could make the computer un operable. That's why caution is needed when you are to do something on it.

The safest way to pinpoint the clutters and remove them is to use a software dedicated to do the job. One of the exceptionally good and has an easy interface to use is the Wise Registry Cleaner. Download this at

http://www.wisecleaner.com/wiseregistrycleanerfree.html


How to use it?


1. Create Back Up


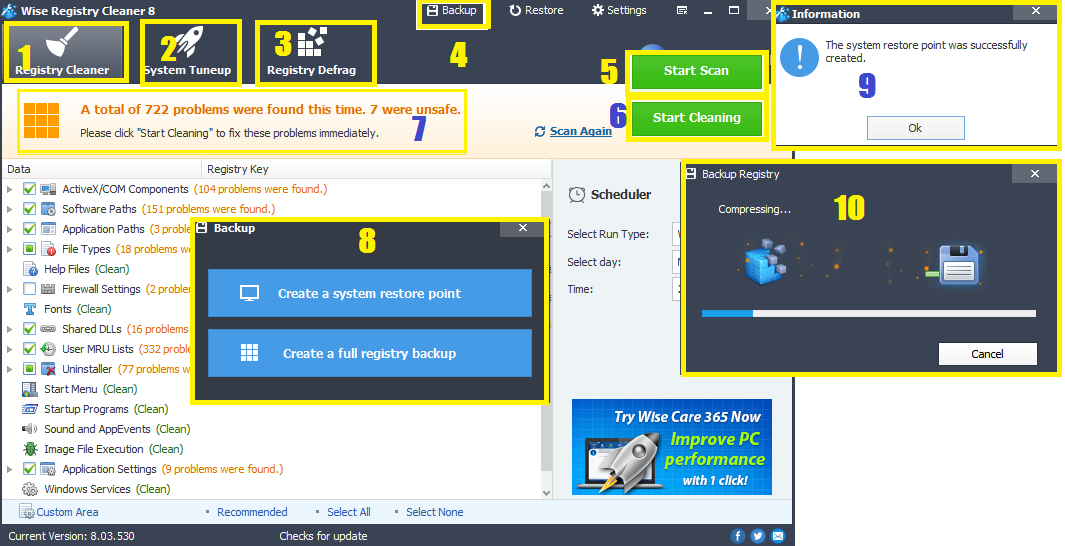
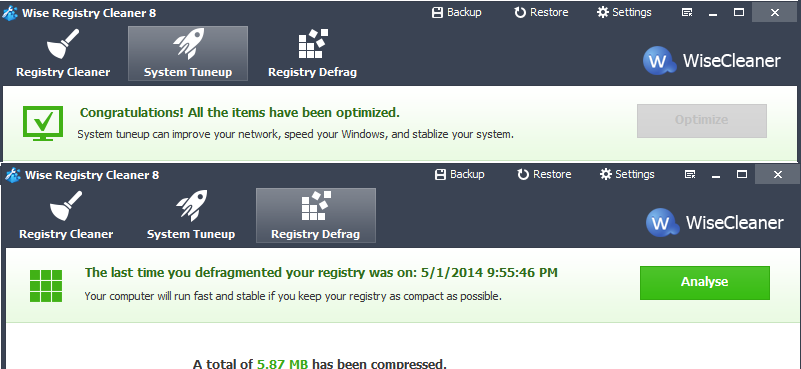
 As this involves the windows registry, it is best to create a restore point and a full registry back up in case something wrong will happen. Click back up(4), then click system restore point(8) and wait until it says system restore point created(9). Next is to make a backup of the registry items(10).

2. Clean Up Registry Files 


The first task button cleans the registry(1). Click on it then you can start scanning(5). The results(7) will show up and the start scanning button will be replaced by start cleaning(8). Click on it to remove the scanned problem files.

3. Optimize the system


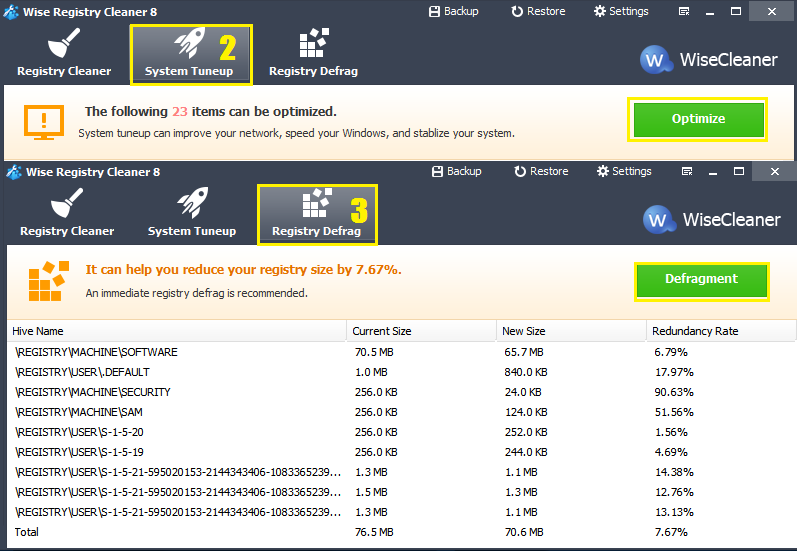
The program can help other components to run at their best by going to the system tuneup tab(2) and clicking optimize button. Improvement include faster start up and shutdown,  network activity, prevents system crashes by closing unresponsive processes. All of these contributes to faster and smoother running computer.

4. Make Registry Files Compact


As the registry is reduced by it's redundant contents, empty spaces are created by the deleted files causing a "gap" between the remaining files. This causes a delay in files being read as the usual continuous sequence is now fragmented by the "gaps". The registry defrag(3) button rewrites the registry without the empty spaces to make it compact. 


Restore From Back Up


If you run up some problems after using the registry clean up,like some programs not running as they shoould, you can restore easily from the computer's previous state by going to the restore button(15), click registry backup(11), highlight the cleaning event that you want to restore, or you can go directly to the system restore and highlight the restore point(12) before the cleaning up the registry, then click restore(14).


Saturday, 26 April 2014

Speed Up Windows Boot Time: Built-in Tweak

"Computers run slower as they get older", this is a common observation that proves to be true. This is caused by many reasons like hard drive being filled up with programs, and applications that make themselves run when the computer starts. As new programs are adding more functions after updates, this also mean more memory is needed to run them. All of these, and among others, can make the computer start up at a snail pace.

The good news is there are simple and easy tweaks that you can do to make the start up faster. 

Disable programs not needed at the start up


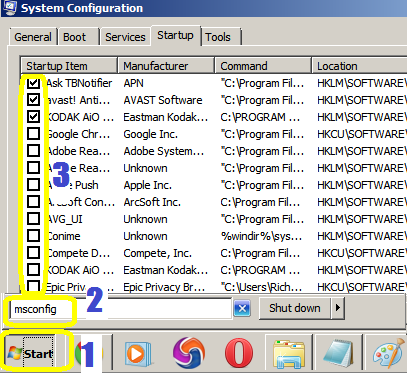
Access the start up menu by going to the system configuration then do the following: click start(1), type msconfig(2), enter, then click start up tab, then untick(3) the programs that are not needed to boot up the computer, like social networks, VOIP(e.g. skype), messengers(e.g. yahoo), third party updaters(e.g. google, yahoo),  media players(e.g iTunes), browser add ons(toolbars) and so on. You need to make sure not to untick applications that are needed like pointing device, those with intel labels and antivirus. If you are not sure of which application to disable, a list of start up programs can be seen at 


The list includes recommendation on whether to disable it, or leave it as it is.


Delay automatic services


You can access the services at the dreaded part of windows, the registry. Click start then type in services(4) at the search box. You'll be looking at the entries with automatic setting at the long list of windows services. These are the services that start together with the boot up. Delaying these will make the computer to load the OS without much competition, so therefore will make it faster. 

As this is the registry, you might want to do a screenshot of the list before putting them into delayed start, or export a list(8) by clicking action first, so that just in case you will encounter a problem, you'll have a guide to the original value of the start up type. 

In my case I have chosen only those services that I know example like those from adobe, apple, google, nero and other third party apps that I have installed myself.

To delay a service, hover your cursor to the  entry name(5), right click, properties(6), then select delay from the search box(7). Don't forget to click apply to take effect.


Delete or hide fonts


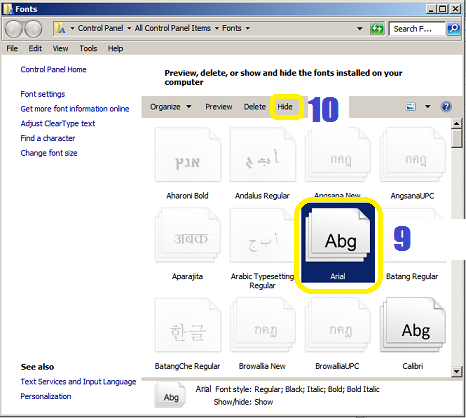
Did you know that Windows loads up fonts you use in word processing applications whilst the computer is starting up? Deleting those you do not use or just by hiding them can also shorten the boot time. Access the fonts folder by clicking start, type fonts at the search box. Highlight the fonts you do not use and select hide from the menu.

You can even uninstall those you do not use to clean up the disk space.


Use full power during boot up


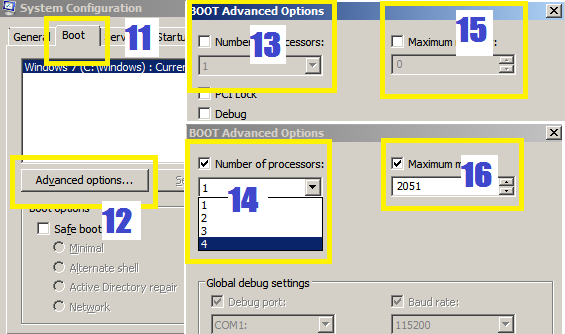
If your computer is running on more than one processing core, then you can use it to speed up the boot process. Initially the computer is not set up to use all cores and RAM for the start up process. To do this, go to the systems configuration(start, msconfig) and click the boot(11) tab. Then click advanced options(12). Tick the number of processors(13) to adjust how many cores to use. In this case the more is better. Tick the memory box (15) and to allocate the amount of RAM (16) by clicking the arrows or typing in a value. 


Use high power option to improve performance


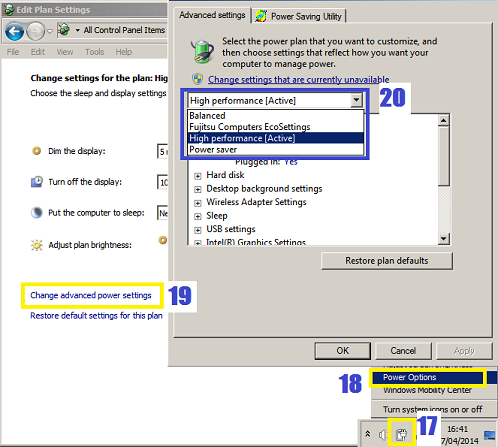
If you are using a laptop, you can improve it's overall performance by adjusting it's power option into high performance rather than the pre-configured power saving feature.  Most laptop makers ship their product on this setting to improve battery life but this compromise performance in return. To change this, hover your cursor to the battery icon (17) and right click on it. Choose power options(18) to get to the advanced power settings(19) where you can select high performance(20) setting.

Choose performance over appearance


Windows has settings that improves the way it's windows look, or the way it closes and open windows like animations, drop shadows on the icons, mouse trails and etcetera. This might improve its appearance but it's computing power will be divided not only to it's performance but to the aesthetic aspect. This also contributes to slow response and boot time. Luckily you can choose to have a faster computer than a better looking one.

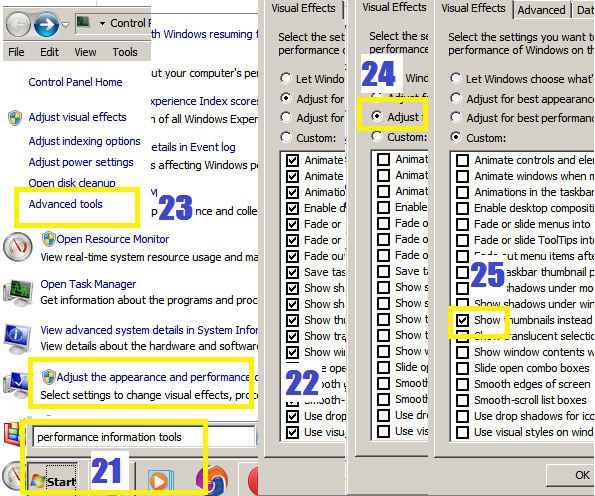
To do this, click start and type in  performance and information tools(21), then click advanced tools(23). From the pop up window, click adjust the appearance and performance of windows(22) and tick adjust for best performance(24). This will remove all animations and fancy folder stuff . Your photo folders will not show thumbnails or photos but icon of the default program. Just tick the show icons (25) to bring this function back.


Saturday, 22 February 2014

How to Merge Partitioned Drive in Windows 8

My daugther's Windows 8 laptop has 500 GB of hard disk space and partitioned into 2 major drives, C and  D. there is nothing wrong this. The only "inconvenience" of the partitioned drive is when drive C will be filled up. Saving files would be to specify which drive to save every time you do the task. It would be repetitive and inconvenient to save and to access files. The computer will also slow down because the programs and files are located in one location, the C drive.

The solution is either to re path the saving of files to drive D or to move back the unused drive to C drive to form a single drive. The problem with re-pathing is you need to do this for every user accounts, and also, if you will be downloading and installing programs, these will be installed and run using primary drive, which is drive C. So the later is better.

What software do I need?


I thought I will need a drive manager to do this, but Windows 8 has a built in software already. I am not sure about previous Windows versions. I can not find this option in Windows 7 or Vista. Here's how!

Easily Merge Partitioned Drive in Windows 8.


  • Go to My computer and click manage(1).


  • Click Disk Management(2), Highlight drive D(3) and right click it then choose delete(4). The selected drive will become unallocated(5).


Now you are ready to merge both drives into one drive C.

  • Highlight drive C(6), right click it and select extend(7). The unallocated drive will be selected automatically and all you need to do is to press next(8). A confirmation window will appear, click finish(9).


The unallocated drive will disappear and the drive C will increase in capacity(10). You can also see the change in windows explorer, My Computer (11) view.


Saturday, 24 August 2013

Windows Top 6 Practical Tips and Tricks

Call me an old timer but even with the presence of portable and mobile computing, I am still stuck with my laptop for productivity reasons. And with the high price of apple notebooks, I am contented with my windows machine. Windows performance is not that bad in my opinion, although users encounter more problems than using an apple machine. From time to time, I encounter these too, from simple to complicated that are really annoying. Here are my top 6 annoying problems and the tips and tricks to get round these .

1. Long boot up period


From the moment I turn on the button until the time the machine is ready to use sometimes takes very long time. Anytime longer than 3 minutes is not acceptable to me. Something might be happening during or after the boot up period. In my case, many times the problem occurs at the end of the boot up. I say this because the desktop is showing, but it seems like the machine doesn't want to do anything and not responding to my clicks.  Here are the causes I have encountered.

Legitimate program activities

Sometimes even though they are legitimate programs, they can make themselves come to life, without the user knowing, when I power up my laptop,  like windows messenger logging in, real player readying itself to go online for update checking, anti virus is doing a scan and so on . There's nothing wrong with it but this process can delay the time before I can do anything. The solution to this is to get into the settings of the program and turn off the feature.

To stop my antivirus auto scanning(I use AVG) on start up, I need to open(1) it up and  and go to Options, Advance Settings(2), click Schedules then Scheduled Scans(3). then untick the Run On Computer Start Up(4) and also at the advanced scheduling options, untick(5) "run when computer  starts up when task has been missed".


I do not actually scan my laptop regularly, but I DO update it's virus definition every time.

Illegitimate program activities

Have you experienced a pop up window saying "scanning for viruses" then scares you afterwards as it says it detected some infections with your laptop? Most of the time, this warning is just coming from a scareware, tricking you into clicking and downloading a link that promises a cure and removal of threats. Don't fall to it as it can do more harm and good.


To stop this from showing up during boot time,or any other internet related pop up, goto start(1), type mscofig(2) at the search box, click msconfig(3), at startup(4) look for the program's name and untick it.  Better is to uninstall it totally(you can do this at programs and features). You can also disable other unnecessary programs (red boxed) by unticking them so they will not load during the start up. Do not forget to click apply button. To take effect, restart the computer.


2. If you own a laptop use hibernate instead of shutting down 

This is a power saving feature of laptops an a better way to exit windows. Instead of shutting down the laptop, just close the lid and the machine goes into hibernate mode, meaning the laptop puts opened documents and programs into the hard disk, and then turns off  itself. And the next time you press the power button, the computer starts quicker than powering following a shut down. The best part is, you can resume documents you have been working or can go to the same web site before you have closed the lid. It is also uses less power compared to sleep mode.

To activate hibernate mode, go to control panel, power options, control settings, choose what closing the lid does, then choose hibernate from the drop down menu. And do not forget to save the changes.


3. Other slow browsers and crashing chrome

Browsers are not made the same. As they are developed by different technologies, the speed of rendering a webpage is also different. Some are faster and others are slower. Others are prone to crashes as well. SO far I have tried several browsers when surfing, and I find that Chrome is still the fastest among the rest. It is also the easiest to operate.

Chrome is good but sometimes it crashes too. It's good it shows you which plug in is crashing. You can change plug ins easy and can choose which one(1) to delete or keep. The built in(2) browser task manager is also very useful in determining which browser window is the most active and uses much of the resources. Ending this can free up memory and make chrome continue to respond.


 4. Video files not playing


Do you use Windows Media Player or Real Player to play movies? Sometimes they do not play certain video files and they ask for a plug in to be installed. I encountered a non playing movie file that has been given to me. It was a raw video file from a DVD disk on a memory stick. Itunes, windows media player and real player can not play it and are asking for plug ins.

I was not bothered to search for plug ins and do not have the time to experiment so I tried VLC media player. It worked on a VOB file with ease. It handles all video files at my disposal and has no problem with physical disc as well. VLC is now my default video player.

5. Unresponsive program whilst multi tasking


With higher computer specs of today,  most of the time I do multi task whilst updating my blog. I usually open two image applications and toggle between them, notepad, and different web pages rendered with different browsers. This overwhelms my laptop and makes it grind to a halt by a non responding page or a crashing application.  This will also leave the computer unresponsive with mouse clicks.

To get round to this is to terminate the unresponsive web page or application by pressing simultaneously ctrl-alt-del. This gets you into the task manager's page(1), you can see the unresponsive program(3)causing trouble under the application's tab(2). Highlight it then end the task(4). You might need to do this several times to a stubborn program. If it still not doing anything, try go to the processes tab (5) and end the program that is having a big bite on the RAM(6)(which is usually on top of the list). Do not forget to click the end processes button(7).


6. Sensitive files falling into the wrong hands

If you have heard in the news (Phil. news)  what happened to Chito Miranda and his girlfriend in the past, then this tip is relevant. You might have read advises from experts to encrypt your data or putting on passwords to your files so that nobody can access them specially when they are very private. But sometimes this is not practical. Hiding the file is another option but it can still be easily located.

A more practical way of preventing access to your files is to rename it's extension. This is "literally" changing the default program reader of your file. For example, if you have a picture file like pic1.jpg, change jpg into avi, this will become pic1.avi. The computer will try to open the file with a video program but the video application will encounter a problem because it is not a video file. This will result in error reading, and your file not able to load. You can revert this anytime by doing the reverse, changing the extension name.

You do need to let windows show the file extension, because it doesn't show it by default ( pic A).

To do this, make sure your computer shows the extension of your files. Check this at control panel, folder options, under view tab(1) scroll and untick(2) "hide extensions for known file types", then apply(3). This will now show the file extension (pic B).

Right click(4) on the file and rename(5) it. Point your cursor after the period and rename (6) the extension into any thing you want. A warning message will pop out(7). Don't worry because the file will remain intact.


Now try to open the file.


I usually use this technique at a shared drive at my work, so that I can open up my files who ever is logged in, without them being able to access it. The file is visible but unreadable. You can revert it back by renaming it into the correct file type.

With little imagination and practical thinking, it is easy to get more out from your computer without buying additional products.


Wednesday, 12 June 2013

Problem Solver Recorder


Do you have computer problems, especially with windows operating system, that you would like to share to others and see if they have solutions? Long before, I tell my friends to use remote access programs, particularly team viewer, to see what's going on, and that's the method I did to resolve  a friend's monitor showing a rotated image. This is good but this includes, conversation  over the phone and a program to download for the other party.  Another method is to tell them to take screen shots and label as necessary on what's happening before sending it as an email. Both are time consuming and can delay the help they needed.

One thing I did not know is that there is a program within windows that can record exactly what you are doing and makes a screen shot with every mouse activity. This makes error reporting very easy and mess free. You do not need to do anything, or download any program to make a professional looking error reporting. Here's how to access it.

Enabling Problem Solver Recorder


I am using a Fujitsu windows 7 with this tutorial. 

Click start (1), type cmd (2) at the search window, press enter.  At the command console, type psr (3), then press enter. The PSR tool bar will appear.


Using PSR


Start Recording

It is so easy to use, just press the record button and it will start taking screen shots with every mouse activity and automatically write a narrative of what is happening. If you do not want to record a particular mouse activity, just press pause record and when you are ready, press the record button again.

I would recommended to close all windows except the one you are working on or thinking of recording it to lessen the confusion.


Stop and Save Recording


Clicking the stop button (1) would save your recording usually at the desktop on a zip folder. You can name (2) the folder anything you want but the file name within has a default name and can't be renamed.


Inside the zip folder(1) is the file name of the MHTML document(2). You do not need to unzip it like other zip files. just click it and it opens instantly. It can be emailed to a friend or to an IT support as an attachment. Just be sure to review your recording as it can record sensitive information through the screen shots. You can also review your screen shots as slide shows when previewing.


You can email the zip folder to your contact and the recipient can easily open it without any additional tool.

Click link below to view sample of  the recording using PSR.


This recorder can be used not only to ask for help, but to explain a user's activity without any sweat!

Wednesday, 24 April 2013

Make Windows 8 Easier to Navigate


Windows 8 is faster than the previous versions. The only thing that is somewhat restrains me from using it is its tiled interface. As the live tiles view  are new to me, it is something that needs to get familiar with. At first, I feel lost, I do not know where things are, and I admit I do not know where to start. And this makes things to slow down.

No start button


This was my first problem, to look where the start button is. There is none. But start typing whilst you are in the tiles (start) page, will activate the search function. Windows then shows you the possible files or programs based from the keys you input. If you are looking for control panel for example, just type "C" and windows will show you the link and icon that starts in "C" including that of  "control panel" to click.

Where's the usual accessories?

.
In case you are looking for the calculator, notepad, or paint in the list of files or programs, you might notice that there is no folder named "Accessories" where they usually reside. You need to go further down to "Windows Accessories" to see these.

Not all default  tiles are relevant to users


The tile window is very new and look pretty good. It's like a collection of icons similar to a smartphone. But unlike smartphones that most of the icons there are useful to the user, (How can I tell?  Well they won't be there if the user did not think they are useful to be downloaded) the native tiles are somewhat not relevant to users. And this is where the slowdown occurs.

But the good thing is you can choose which tile to put on and easily delete those you do not like.


Customize the tiles


Windows 8 is easier to use when the start tiles are relevant to the user. Like knowing exactly where to click the usual programs, users usually use, like my computer, control panel, connected devices, favourite programs and utilities. This is all done by "pinning" the programs at the start menu.

  • Unpin tiles you do not use


First is to "weed out" things you do not want to make space for the things you want. Hover your cursor to the top or bottom right (yellow arrow)of your screen, click settings (green arrow), right click (1) on the tile that you want to unpin then click unpin(2). Keep doing it until everything you do not want is removed.


  • Choose and pin programs


Access all apps by right clicking at an empty space, to show all apps (green arrow).


Then go to the apps, utilities and accessories you usually use, or anything you think is useful to you. Right click it(1) then pin to start(2)


  • Rearrage it

Rearranging the tiles is also quick and easy. Just drag and drop each tile to where you want it to be. Here's my trimmed down start tiles with my favourite programs and utilities I usually need beginning with the desktop. You can arrange it alphabetically to make your computer time easier and more productive!


google.com, pub-9356159227116695, DIRECT, f08c47fec0942fa0

ShareThis

Popular Posts