Does your smartphone seem to run slower than usual? Or has an observable delay before it responds to your touch when you launch an application, and restarting it does not solve the problem? The slowdown is not caused by a single factor alone but most of the time it is a result of a combination of situations. Here are the most common reasons and what to do about on each.
 Every application we download is saved in the internal memory of the phone by default and run from there. The more apps we download, the more likely that the available space will soon be running out. This will result in the slowdown of performance.
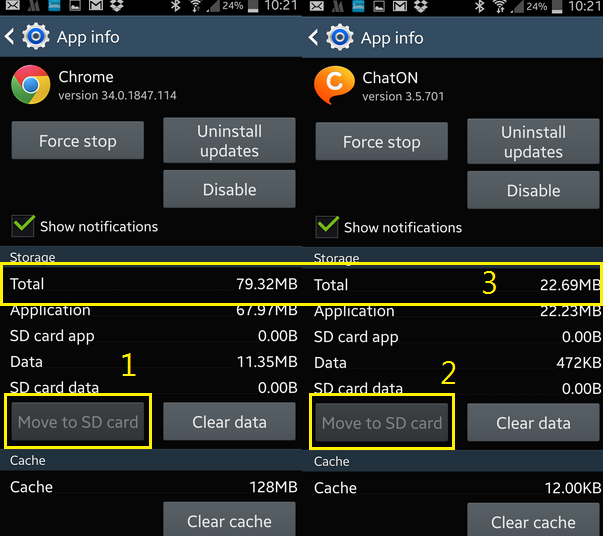
Solution to this is to move the applications to the external SD storage. The problem is only a handful of applications can be moved without rooting your phone first. To see which applications can be moved, go to settings, general, application manager then tap any of applications. If the move to SD card button is greyed out(1,2), this means it can not be moved. As you can see, these apps, usually have large total byte size(3).
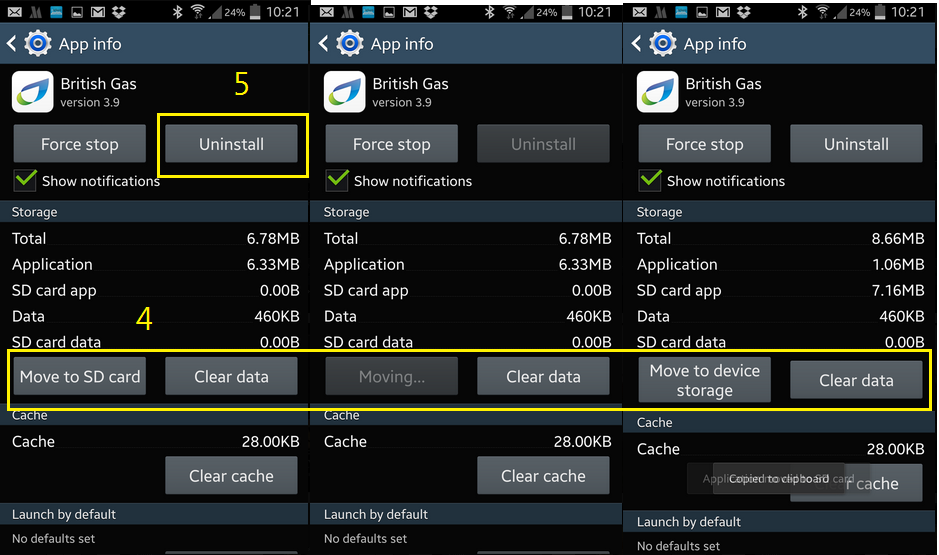
The move to SD card (4) button is active to apps that can be moved to an external storage. Tapping this button will transfer all files related to the apps into the SD card.
 The fact that not all apps and usually the large sized applications can not be moved, the simplest solution here is to choose wisely which one to install and uninstall(5) those we seldom use or never used.
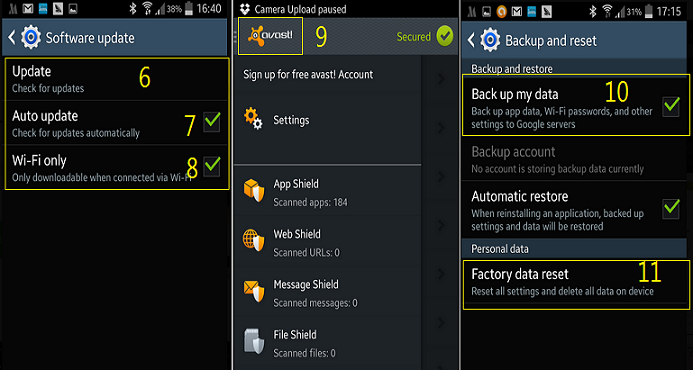
If your phone is not set to auto update, you can do this manually by going to the settings, general, about device. You need to be connected to wi-fi rather than data connection and it is advisable to connect it to the mains charger. Tap software update, then update(6) to see if there is an available download for your phone. This will take sometime so be patient. You can tick auto update(7) to check for updates automatically. Because the updates contain usually big files, it is better to tick wi-fi only(8).
Like computers, smartphones are also vulnerable to infections, viruses and other malwares. These could significantly affect the performance of your phone. As these are usually concealed to other softwares when we download apps, we do not know we got them until symptoms appear. It is also advisable to download antiviruses from reputable and popular companies. Avast (9) and AVG two of the leading names in internet security, have free versions to download from the play store.
Once downloaded, it is advisable to check for the recent update before you begin your first scan.
Closing up applications do not mean the programs has already shut down, sometimes there are programs that are still running on the background. As they are still running in the phone's processes, they are still using the phone's random memory without us knowing, and this results in the phone's sluggish performance. . Restarting the phone will cure this and also get rid of various glitches when apps become corrupted that impedes performance of the device.
Restarting the phone do not only includes powering off the phone. It is also a good practice to pull the battery out and reinsert it before powering it back on again.
If you have done everything and you think the phone's performance is still not improving, the best remedy is to reset the phone into it's factory setting. This means, everything in your phone will be wiped out, including contacts, photos, downloaded applications, account settings and etc. So before you do this, you need to back(10) these up otherwise you will lose them all. To reset, go to settings, general, backup and reset, factory data reset(11)!
1. Clear up running out built in memory
Every application we download is saved in the internal memory of the phone by default and run from there. The more apps we download, the more likely that the available space will soon be running out. This will result in the slowdown of performance.Solution to this is to move the applications to the external SD storage. The problem is only a handful of applications can be moved without rooting your phone first. To see which applications can be moved, go to settings, general, application manager then tap any of applications. If the move to SD card button is greyed out(1,2), this means it can not be moved. As you can see, these apps, usually have large total byte size(3).
The move to SD card (4) button is active to apps that can be moved to an external storage. Tapping this button will transfer all files related to the apps into the SD card.
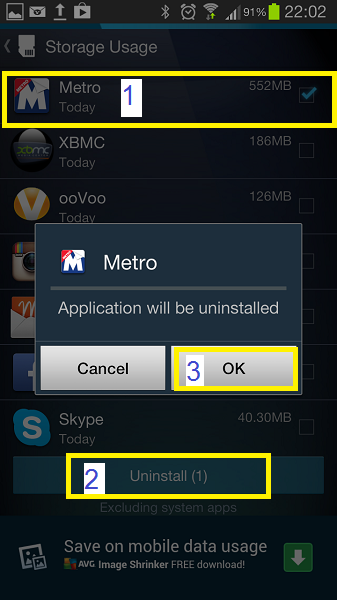
The fact that not all apps and usually the large sized applications can not be moved, the simplest solution here is to choose wisely which one to install and uninstall(5) those we seldom use or never used.2. Update the firmware
If your phone is not set to auto update, you can do this manually by going to the settings, general, about device. You need to be connected to wi-fi rather than data connection and it is advisable to connect it to the mains charger. Tap software update, then update(6) to see if there is an available download for your phone. This will take sometime so be patient. You can tick auto update(7) to check for updates automatically. Because the updates contain usually big files, it is better to tick wi-fi only(8).
3. Install antivirus
Like computers, smartphones are also vulnerable to infections, viruses and other malwares. These could significantly affect the performance of your phone. As these are usually concealed to other softwares when we download apps, we do not know we got them until symptoms appear. It is also advisable to download antiviruses from reputable and popular companies. Avast (9) and AVG two of the leading names in internet security, have free versions to download from the play store.
Once downloaded, it is advisable to check for the recent update before you begin your first scan.
4. Restart the phone
Closing up applications do not mean the programs has already shut down, sometimes there are programs that are still running on the background. As they are still running in the phone's processes, they are still using the phone's random memory without us knowing, and this results in the phone's sluggish performance. . Restarting the phone will cure this and also get rid of various glitches when apps become corrupted that impedes performance of the device.
Restarting the phone do not only includes powering off the phone. It is also a good practice to pull the battery out and reinsert it before powering it back on again.
5. Reset the phone
If you have done everything and you think the phone's performance is still not improving, the best remedy is to reset the phone into it's factory setting. This means, everything in your phone will be wiped out, including contacts, photos, downloaded applications, account settings and etc. So before you do this, you need to back(10) these up otherwise you will lose them all. To reset, go to settings, general, backup and reset, factory data reset(11)!